ShiftTools user guide
Everything ShiftTools does, and how to use it. The floorplan has a one-minute tour too: choose Help in its top bar.
- What ShiftTools does
- Getting started
- Finding your way around
- Using the floorplan
- Notes, sickness and absence
- The kitchen screen
- Training
- People
- Tasks
- Finance
- For managers
- The daily tasks email
- Help and fixes
- Words used here
What ShiftTools does
ShiftTools is where each restaurant plans who is on which station for the shift. It reads the rota from LifeLenz, so everyone who is working appears automatically, and you place them on the floorplan. It also keeps notes on shifts, plans breaks, shows training that is due, and sends a daily list of tasks.
If you're on shift Everyone
- Open your store from the Stores page.
- Enter the store password.
- Find your name and your position on the floorplan.
- Take the tour from Help if it's your first time.
If you plan the shift Everyone
- Pick the date and shift.
- Press Auto-assign, then drag people to tidy up.
- Check the Breaks view.
- Print it, or leave it on the kitchen screen.
If you manage the store Managers
- Sign in with your email address.
- Change stations and slots with the cog (Edit layout) on the floorplan.
- Check Training each week (it is on your store's bar).
- Set up the daily tasks email in Store settings.
Everything it does
| Feature | What it does | Who |
|---|---|---|
| Floorplan | Place everyone on the shift onto stations and positions, by drag and drop or by clicking. | Store password |
| Shifts from LifeLenz | Everyone rostered for the date and shift appears in the "To place" list, refreshed every 5 minutes. | Store password |
| Auto-assign | Places people on stations using their LifeLenz positions. | Store password |
| Clocked-in colours | Each name shows if they are clocked in, ending soon, or not in yet. | Store password |
| Add, edit and remove shifts | Cover someone who isn't on the rota, or change times, on this floorplan only. | Store password |
| Saved automatically | Every change saves by itself and is shared with every screen. Undo and redo are built in. | Store password |
| Hourly sales and labour | Projected against actual sales, and scheduled against actual labour %, from LifeLenz. | Store password |
| Shift targets | The day's four targets above the floorplan, with focus areas on their own view. | Store password |
| Break planner | Who needs a break and a suggested time, staggered by station. | Store password |
| Shift notes | Read, add or edit the note on any shift; a note icon shows on the name. | Store password |
| Mark sick or absent | Takes someone off the floorplan, can change their shift to sickness or unauthorised absence in LifeLenz, and can add a note to their next shift. | Store password |
| The whole floorplan on one A4 landscape page. | Store password | |
| Screenshot | Downloads the floorplan as a picture. | Store password |
| Kitchen screen | A full-screen, hands-off floorplan for a TV that follows the day by itself. | Store password |
| Store bar and Go to | Every page for a store has a bar with its Floorplan, Training, People, Tasks, Finance, Settings and Kitchen screen. Press / from any page to jump to any store or page. | Everyone |
| Light and dark mode | Choose with the moon or sun button. | Everyone |
| Tour and guide | Step-by-step tours of the home page, floorplan, store settings and training, and this guide. | Everyone |
| Training | Verifications overdue or due, crew trainer progress, and training opportunities, from the weekly MyTraining report. | Store password |
| People | Turnover, staffing, recruitment, new starters' on-boarding and HIG chats (with notes on their next shift) and leavers, from the weekly Hiring & Turnover report. | Store password |
| New starters' e-learning | Shows each new starter's SRI e-learning, workplace violence prevention, Creating Belonging and Allergen Awareness, and puts what is outstanding on their next shift (first shift for the first two, day 14 to day 30 for the others). | Store password |
| Tasks | A to-do list for managers: departments with leads, tasks given out and handed over, repeating tasks, each manager's week with their LifeLenz shifts to plan their days, and a follow-up of what is done, due and overdue. | Managers |
| Plan notes for next shifts | Adds "Verification renewals" notes to people's next shifts so they show in the tasks emails. | Store password |
| Edit layout | Change stations, slots, names and columns without leaving the floorplan. | Managers |
| Store settings | Layout, targets, tasks email, floorplan password and LifeLenz connection. | Managers |
| Daily tasks email | Each morning, the day's shift notes grouped by Breakfast, Lunch, Dinner and Overnight, with a one-page A4 PDF to print. | Managers |
| Weekly tasks email | The next 7 days' tasks in one email and one A4 page. | Managers |
| Suggestions | Anyone can send an idea, with optional contact details. | Everyone |
| Other tools | Just Eat invoices, and badges and fundraising. | Everyone |
| Stores and users | Admins see every store's health at a glance, add stores, and approve and manage managers. | Admins |
Getting started
Opening your floorplan Everyone
- Go to the Stores page and choose your store, or go straight to your store's address.
- Type the store password and press Unlock. Ask your manager if you don't know it.
- The floorplan opens on today's date and the Breakfast shift.
Your browser remembers the password for a while. The same password opens the store's Training pages.
The top bar Everyone

The floorplan has the same two bars as every other page, so you always know where you are and how to get anywhere else. Under them are the date and shift controls for this page.
- Top bar: Stores (the list of all stores), Tools, Help, who is signed in and Log out (or Manager sign in), and the moon / sun button for light and dark mode.
- Store bar: the store, then Floorplan (underlined, because that is where you are), Training, People and the Kitchen screen (the TV view). Managers who are signed in also see Tasks, Finance and Settings. It is the same bar as on the store's other pages (see Finding your way around).
- Date, shift and times: which shift you're looking at. They stay at the top as you scroll. Managers also have a cog next to Print and Screenshot to edit the layout.
- Help: the tour and this guide (more on that below).

Take the tour Everyone
The floorplan has a one-minute guided tour. The first time you open it, a bar offers it to you; you can say Not now and take it later.

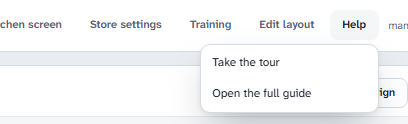
To start it any time, choose Help in the top bar, then Take the tour. The same menu has Open the full guide, which is this page.
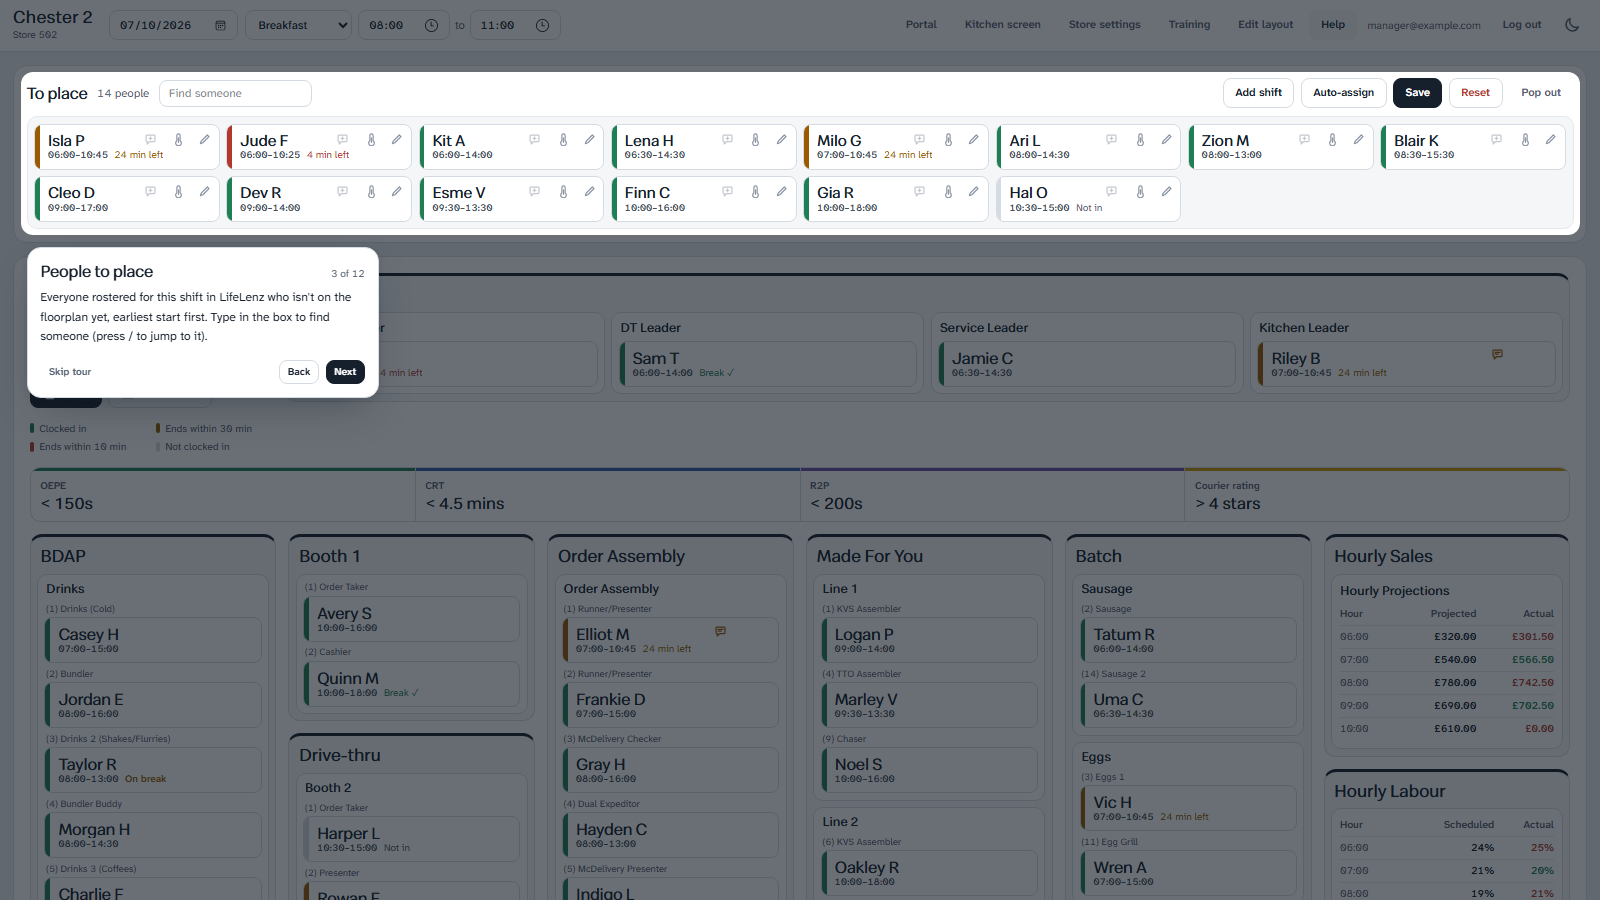
The tour dims the page and highlights one part at a time with a short explanation. Press Next (or the right arrow key) to move on, Back to go back, and Skip tour or Esc to stop.
The home page (the store list), Store settings, Training and People have their own tours too. Press Take the tour at the top right of any of them. The home page tour covers choosing your store, the top menu, signing in, the guide button and the suggestion box. Like the floorplan's, each is offered once the first time you open it (in each browser), and works the same way.
Manager accounts Managers
Managers sign in with their email address and a password, and can change layouts, targets and settings for their store, and use its Training and People pages. You don't need an account just to use the floorplan: open your store and type its password.
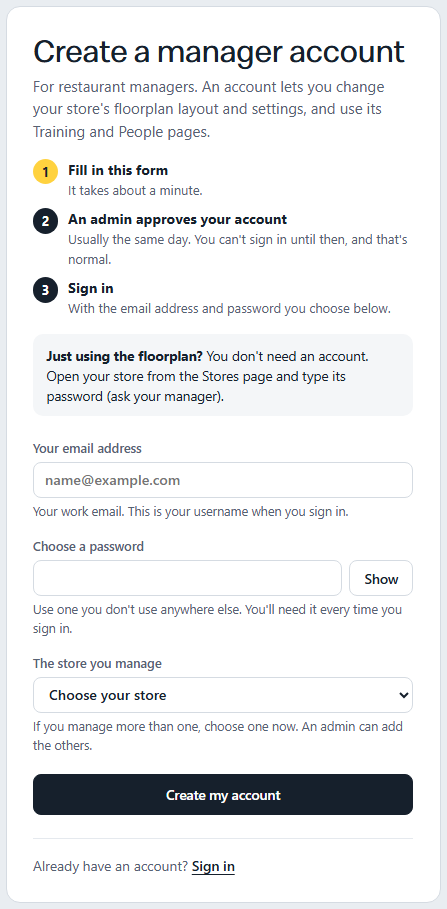
- Choose Manager sign in at the top right, then Create one.
- Enter your work email address (that is your username), choose a password (Show lets you check what you typed), and pick the store you manage. If you manage more than one, pick one now and an admin can add the others.
- Press Create my account. A page tells you what happens next: an admin has been asked to approve it, usually the same day.
- Until it's approved, signing in says your account is waiting for approval (your email and password are fine). ShiftTools doesn't email you when it's done, so try again later.
It doesn't matter whether you use capital letters when you type your email to sign in. If you manage more than one store, an admin can add the others to your account.
Suggestions and what's new Everyone
On the Stores page, Send a suggestion lets anyone share an idea. You can leave an email address or phone number so we can reply, or leave it blank. What's new at the bottom lists recent changes. Tools in the top menu has the other tools.
This guide is always one click away: the ? button at the top right, next to Log out (or Manager sign in), opens it from any page.
Finding your way around Everyone
The site has one set of places, laid out the same way on every page.
The two bars
Every page, including the floorplan, has the same two bars at the top.

- The top bar is the whole site. Stores is the home page where you choose a store, Tools has the other tools, and on the right are Go to, your sign-in, the guide (?) and the light/dark button. Admins also see an Admin menu with Store admin, Users and Suggestions. My store takes a signed-in manager straight to their store.
- The store bar is the store you are in. It names the store and lists its places: Floorplan, Training, People, Tasks, Finance, Settings and Kitchen screen. It stays on every page for that store, so you never have to go back to the home page and choose again.
- Tasks, Finance and Settings are only there for managers of the store (and admins).
- If you look after more than one store, the store's name is a list. Choose another store and you stay on the same page for it (Training stays Training). The Training and People buttons on the Stores page show every store's reports side by side.
- The page's own tabs (for example My week, Team, Follow-up and Setup on Tasks) are underneath, next to the page's title.
Go to
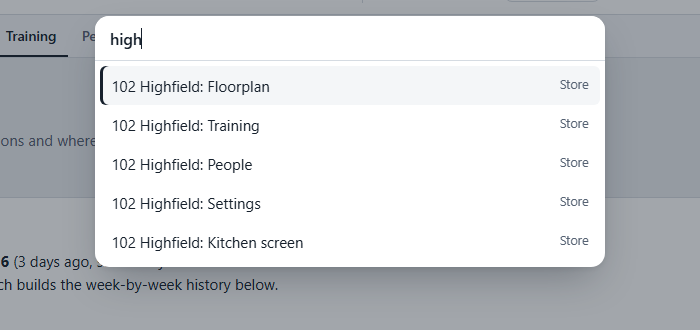
Press / on any page (or Ctrl+K, or the Go to button in the top menu), type a bit of a store's name or number or the page you want, and press Enter. Use the up and down arrow keys to choose another match, and Esc to close it. It only lists places; anything private still asks for the store password or a manager sign-in when you arrive. On this guide page / goes to the guide's own search, so use Ctrl+K here.
Using the floorplan
This is the main screen. Everyone on the shift is in the To place list at the top, and the stations are below.
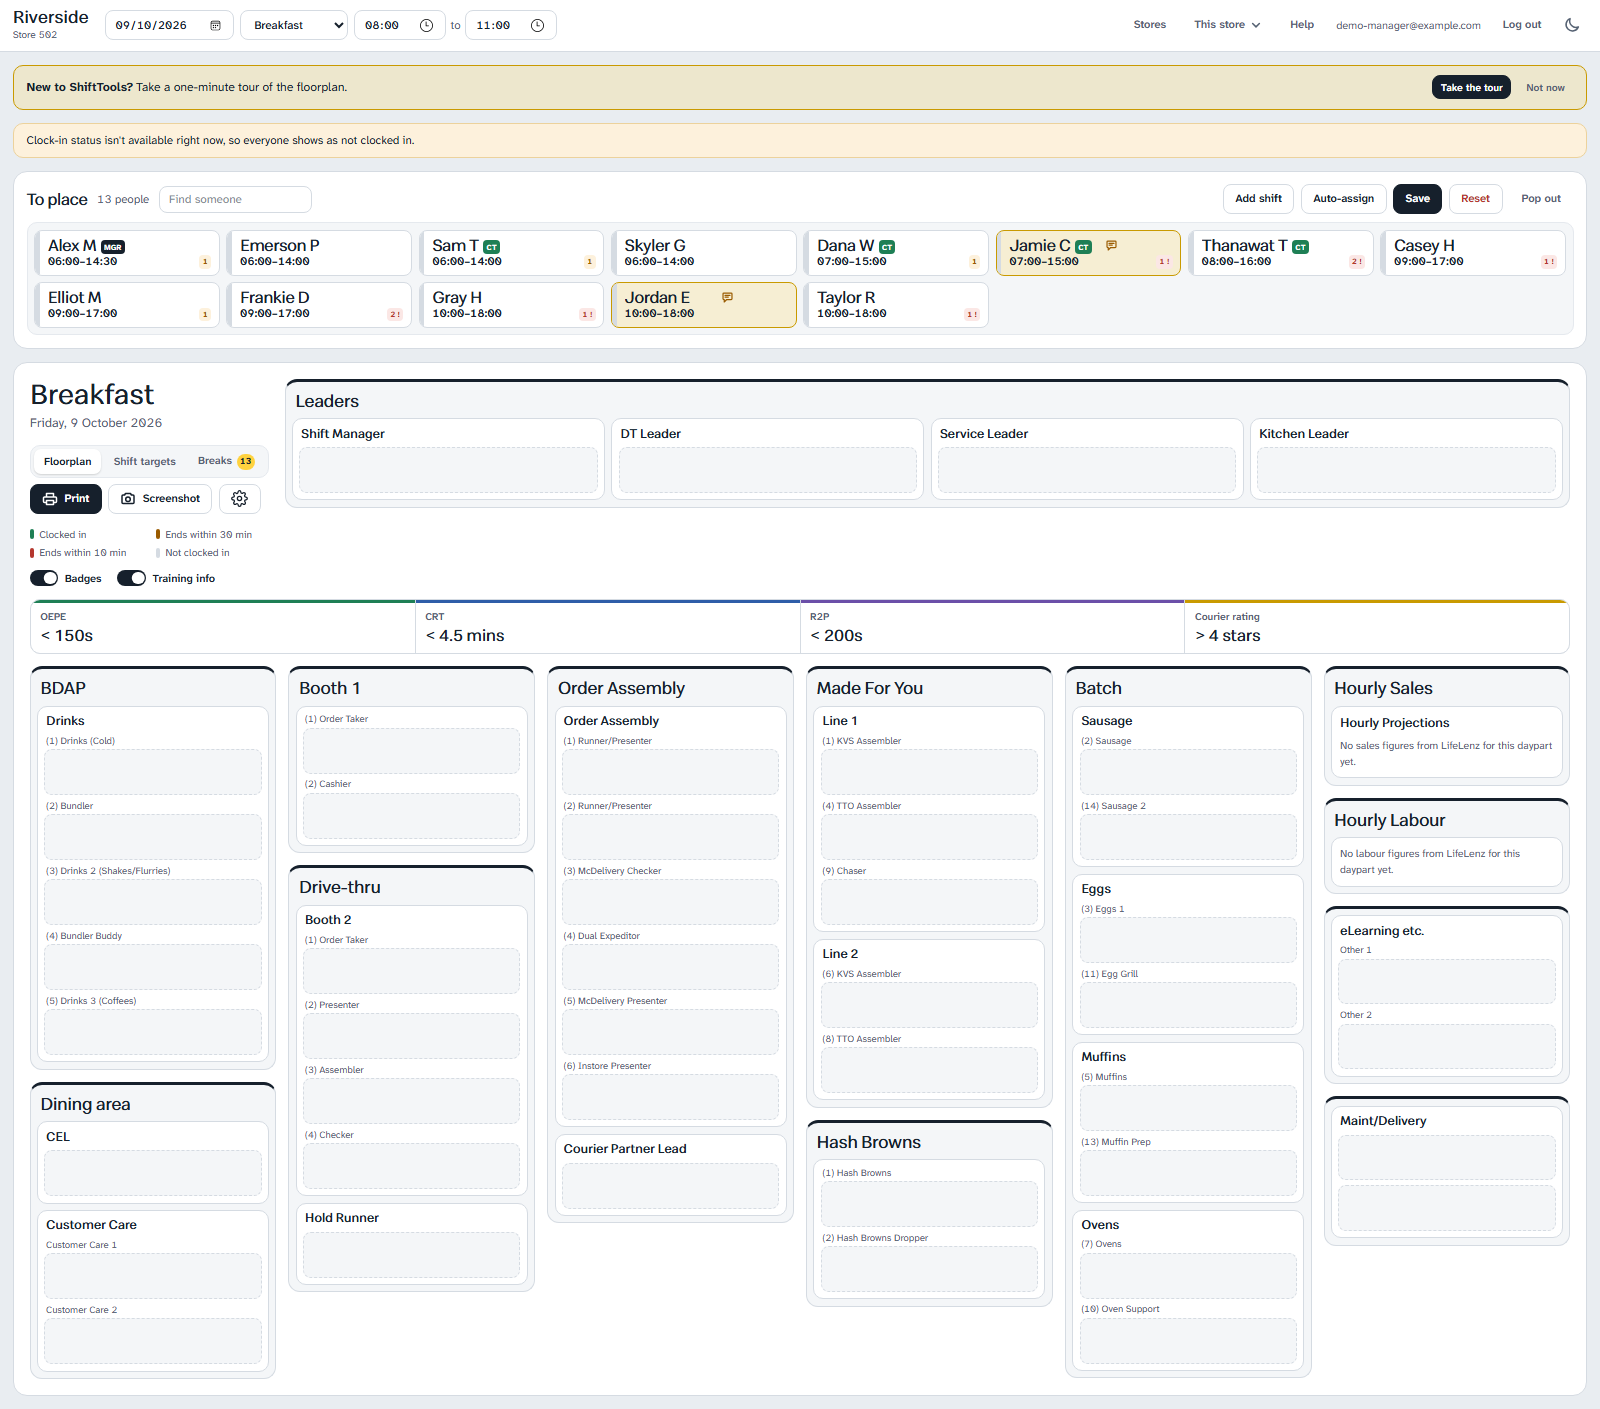
Choosing the shift Everyone
Pick the date and the shift: Breakfast, Lunch, Dinner or Overnight. The From and To times fill in for the shift and decide which rota shifts appear. Change them if you need a different window. Overnight means the early hours of the next morning.
Each date and shift has its own saved floorplan, so you can plan tomorrow today.
People to place Everyone

- It lists everyone rostered for this shift who isn't on the floorplan yet, earliest start first.
- Type in Find someone to search by name. Press / to jump straight to the box.
- Pop out turns the list into a window you can drag and resize, handy when the floorplan is long. Dock puts it back.
- When everyone is placed it says "Everyone on shift is on the floorplan".
Placing people Everyone
Drag and drop
Drag a name from the list onto a position. Drag a name from one position to another to move them. Dropping onto someone who is already there swaps in the new person.
Click, then click
Easier on a tablet: click a name (it highlights and a bar says "Choose a slot for ..."), then click the empty position. Press Esc or Cancel to change your mind.
Taking someone off
Drag them back onto the list, or hover over their tile and press the cross.
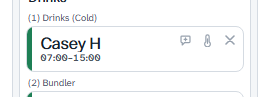
Auto-assign Everyone

Auto-assign places people using the position they have in LifeLenz for that shift, for example Service, Fries or Kitchen. Anyone you have already placed stays where they are, and anyone it can't place is left in the list for you.
- It asks you to confirm first.
- It can be used once for a shift while the page is open. To run it again, reset the floorplan first.
- Run it first, then drag people around to fit the shift.
Adding and editing shifts Everyone
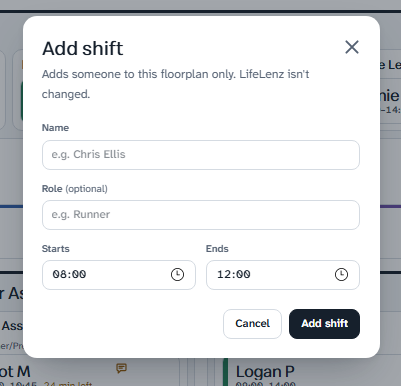
- Add shift: for someone who isn't on the rota (for example a borrowed crew member). Enter their name, role (optional) and times.
- The pencil on a name in the To place list edits their name, role and times, or removes the shift.
- Reset takes everyone off the floorplan for this shift and deletes the saved copy. It can't be undone, so it asks first.
Colours and status Everyone
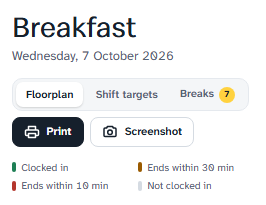
The coloured edge of each name shows where they are in their shift:
- Green: clocked in.
- Amber: their shift ends within 30 minutes (it says how many minutes are left).
- Red: ends within 10 minutes.
- Grey: not clocked in (it says "Not in").
Beside the times you may also see Break ✓ (a break has been taken) or On break. These come from LifeLenz clock-ins, so they appear once the break is recorded there.
Leaders, targets, sales and labour
- Leaders (Shift Manager, DT Leader and so on) always sit across the top.
- The four shift targets sit above the stations. Managers set them in Store settings.
- Hourly Sales shows projected and actual sales for each hour, and Hourly Labour shows scheduled and actual labour %, both live from LifeLenz. Actuals show green when on or better than plan and red when not. A store can choose to hide these.
Shift targets and Breaks Everyone
The buttons under the date switch between three views: Floorplan, Shift targets and Breaks.
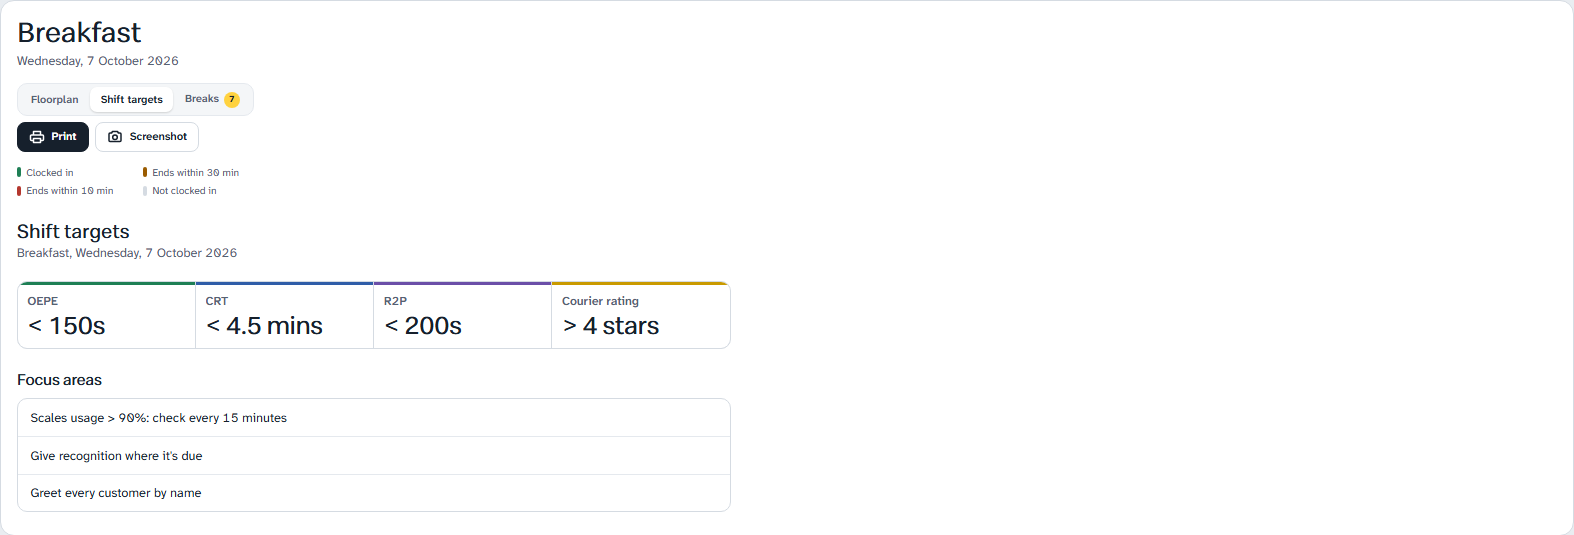
Shift targets shows the four targets large, with the store's focus areas underneath, for example "Scales usage over 90%".
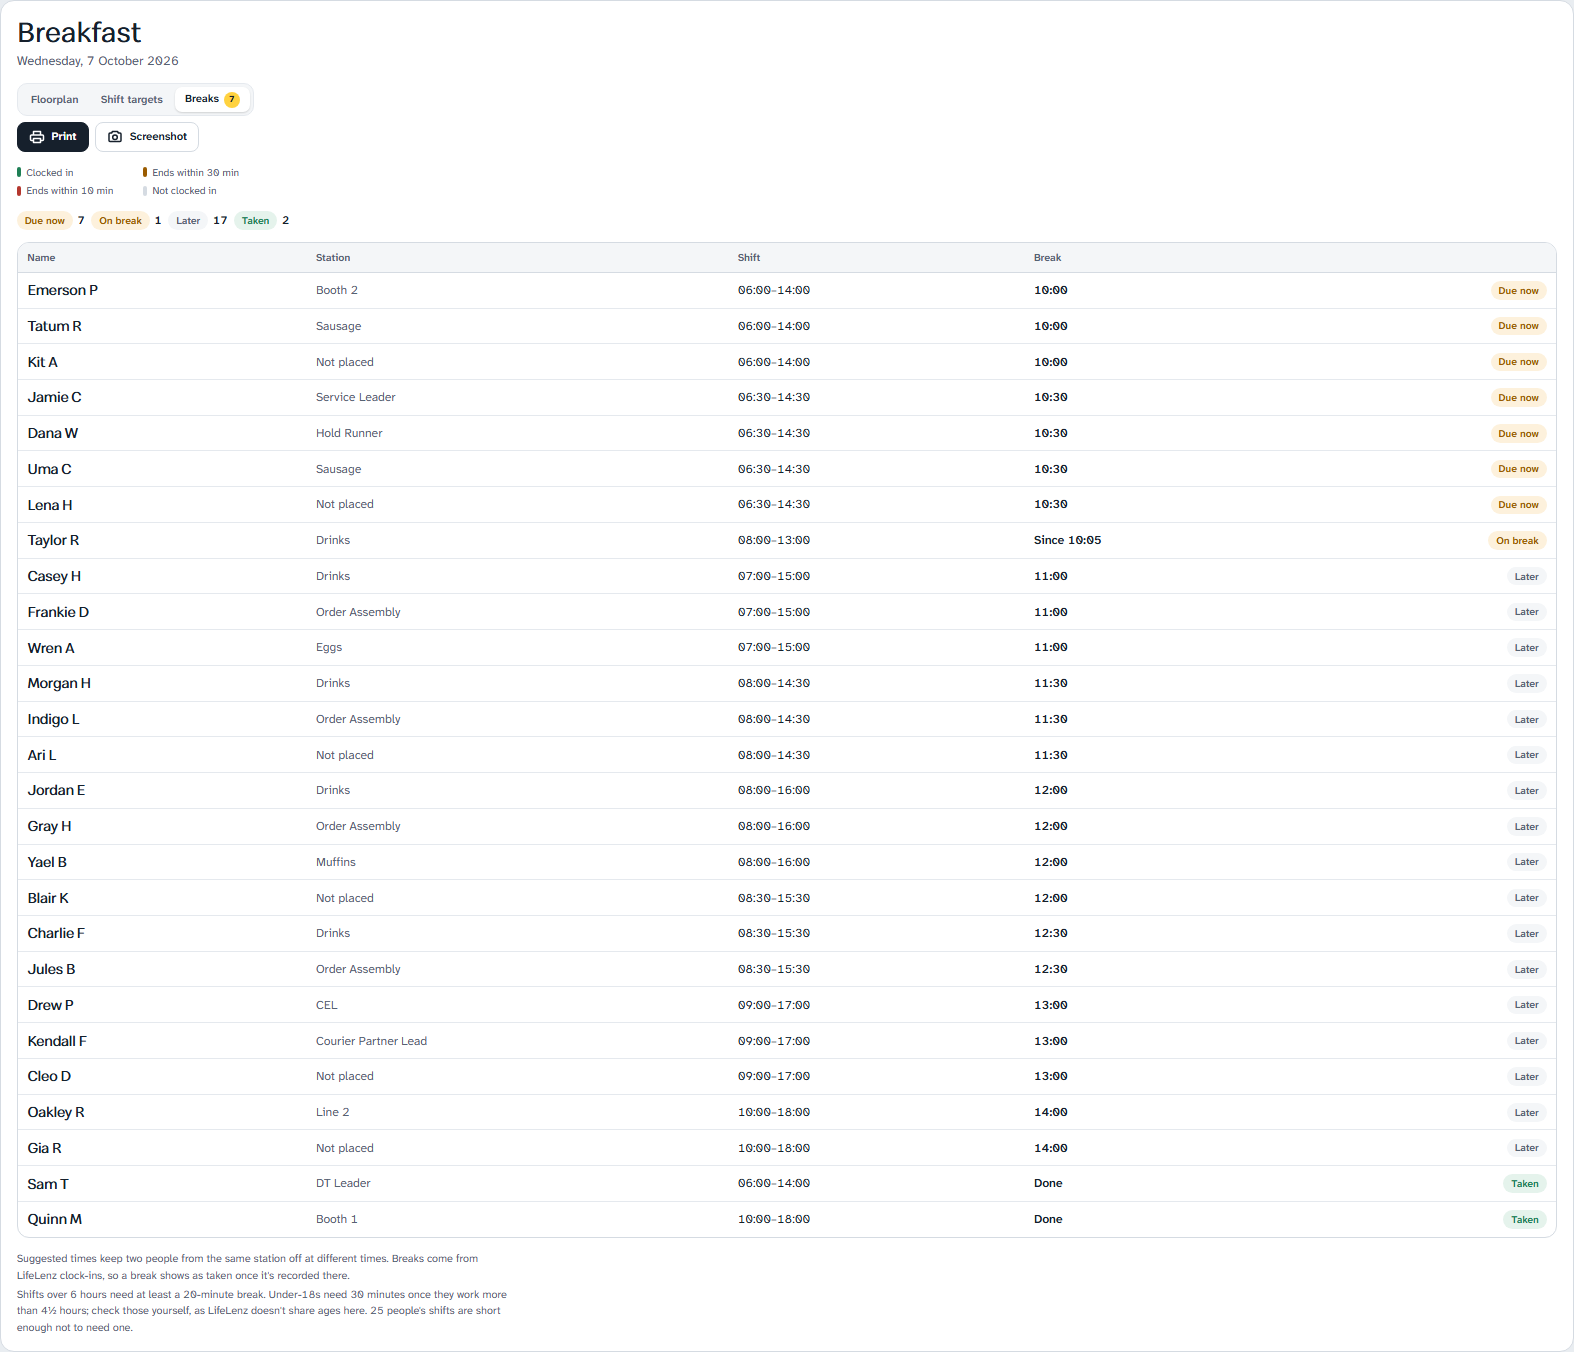
Breaks lists everyone who needs one, in the order they matter, with a suggested time:
- Anyone working more than 6 hours needs a break of at least 20 minutes.
- Suggested times are around the middle of the shift, never in the first 2 hours or the last 90 minutes, and spread out so two people from the same station aren't off at once.
- Status: Overdue, Due now (from 10 minutes before), On break, Later, Taken or Not needed. The Breaks button shows a number when some are due.
- Under-18s need 30 minutes once they've worked more than 4½ hours. LifeLenz doesn't give ages here, so check those yourself.
Print and screenshot Everyone
- Print fits the whole floorplan on one A4 landscape page, however many stations there are. Choose A4 and landscape in the print window if it asks.
- Screenshot downloads the floorplan as a picture (PNG) you can save or send.
Keyboard shortcuts Everyone
Notes, sickness and absence
Shift notes Everyone
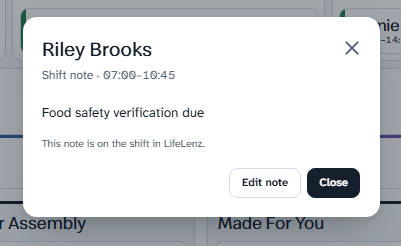
A note is a short message on a person's shift, such as "Manager meeting 2pm" or "Food safety verification due". Notes are saved in LifeLenz, so managers see them there too.
- A small dark MGR badge after a name means that person is booked to the Shift Management position on that shift.
- A green CT badge after a name means that person is a crew trainer. It comes from the store's latest weekly training report (so it appears once a report has been uploaded), and it shows on the kitchen screen and prints.
- Training marks: under a name you may see a red overdue or amber due count of verifications. Hover over it to see which. On a narrow tile the tag shortens to a number, with a ! after it when it's overdue (for example "2 !"). They come from the same report. They show only to someone who has entered the store's password (or is signed in as a manager), never on the kitchen screen, and they never print.
- Hiding badges and marks: two sliders sit under the colour key at the left of the floorplan. Badges switches the MGR and CT badges, and Training info switches the verification counts (it only appears when the store has a training report and you've entered the store's password). Your choice is remembered on that device. They aren't on the kitchen screen, which shows the badges but never the verification counts.
- A speech bubble on a name means the shift has a note. Click it to read it. The whole name tile is also shaded yellow, so a task to do stands out at a glance.
- To add a note, hover over a name and press the speech bubble with a plus. Type the note and press Save note.
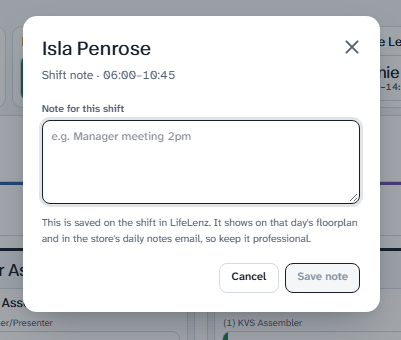
- Edit note replaces what was there. A note can't be removed from here; remove it in LifeLenz.
- Notes appear on that day's floorplan, in the daily tasks email and on its printable page, and as a * on a printed floorplan. Keep them professional.
Mark sick or absent Everyone
When someone calls in sick or doesn't turn up, use the thermometer button on their name (in the list, or when you hover over them on the floorplan).
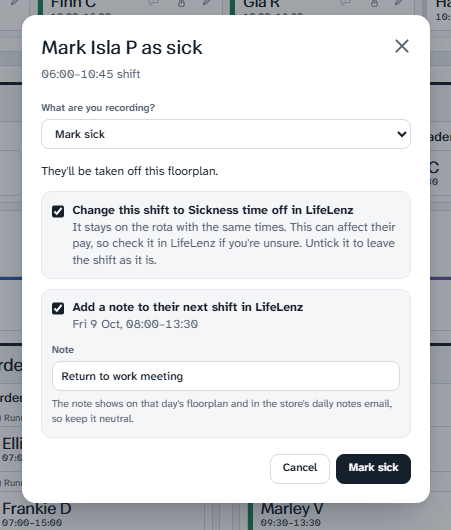
- Choose Mark sick or Mark unauthorised absence from the box at the top.
- Choose what should change in LifeLenz:
- Change this shift to Sickness time off or Unauthorised absence. This can affect pay, so check it in LifeLenz if you're unsure.
- Add a note to their next shift: it shows their next shift's date, and a note you can edit ("Return to work meeting" for sickness, or "Investigate absence and invite to a meeting if required").
- Press the button. A full-screen Are you sure? page shows exactly what will happen.
- Press Yes to go ahead, or No, go back.
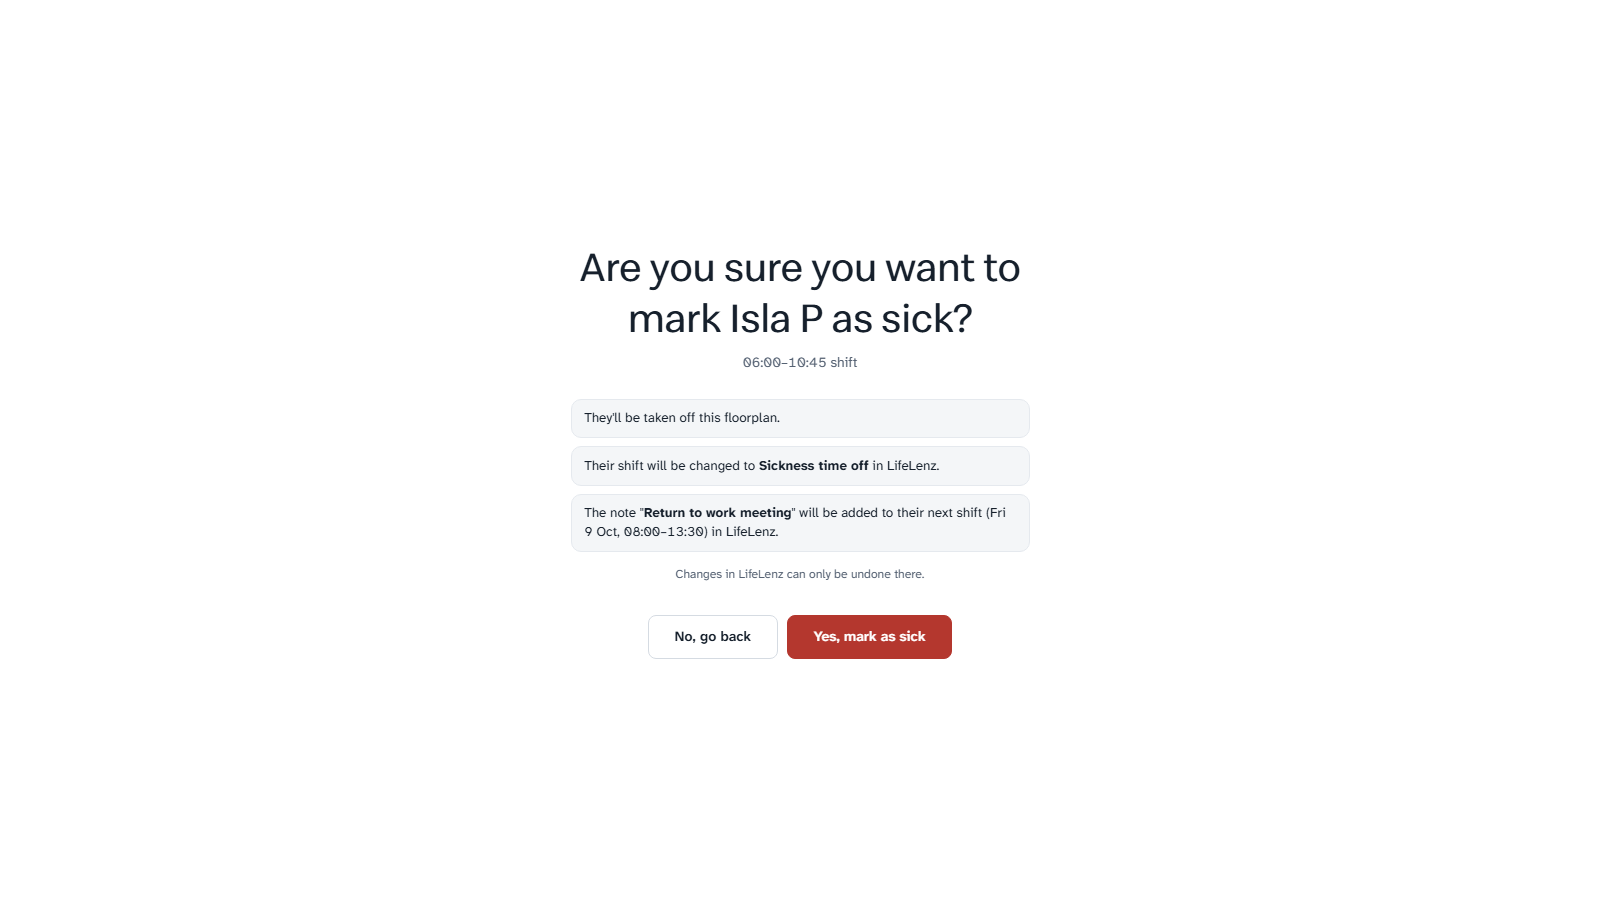
- The person is taken off the floorplan for that shift.
- If something fails, you're told why and nothing is half-done without saying so.
- Changes made in LifeLenz can only be undone in LifeLenz.
- The note on the next shift shows to everyone using the floorplan, so keep the wording neutral.
- Managers or admins can switch this off for a store (see Store settings). The buttons then disappear.
The kitchen screen Everyone
The kitchen screen is the floorplan for a TV or wall tablet. Open it from Kitchen screen in the top bar.
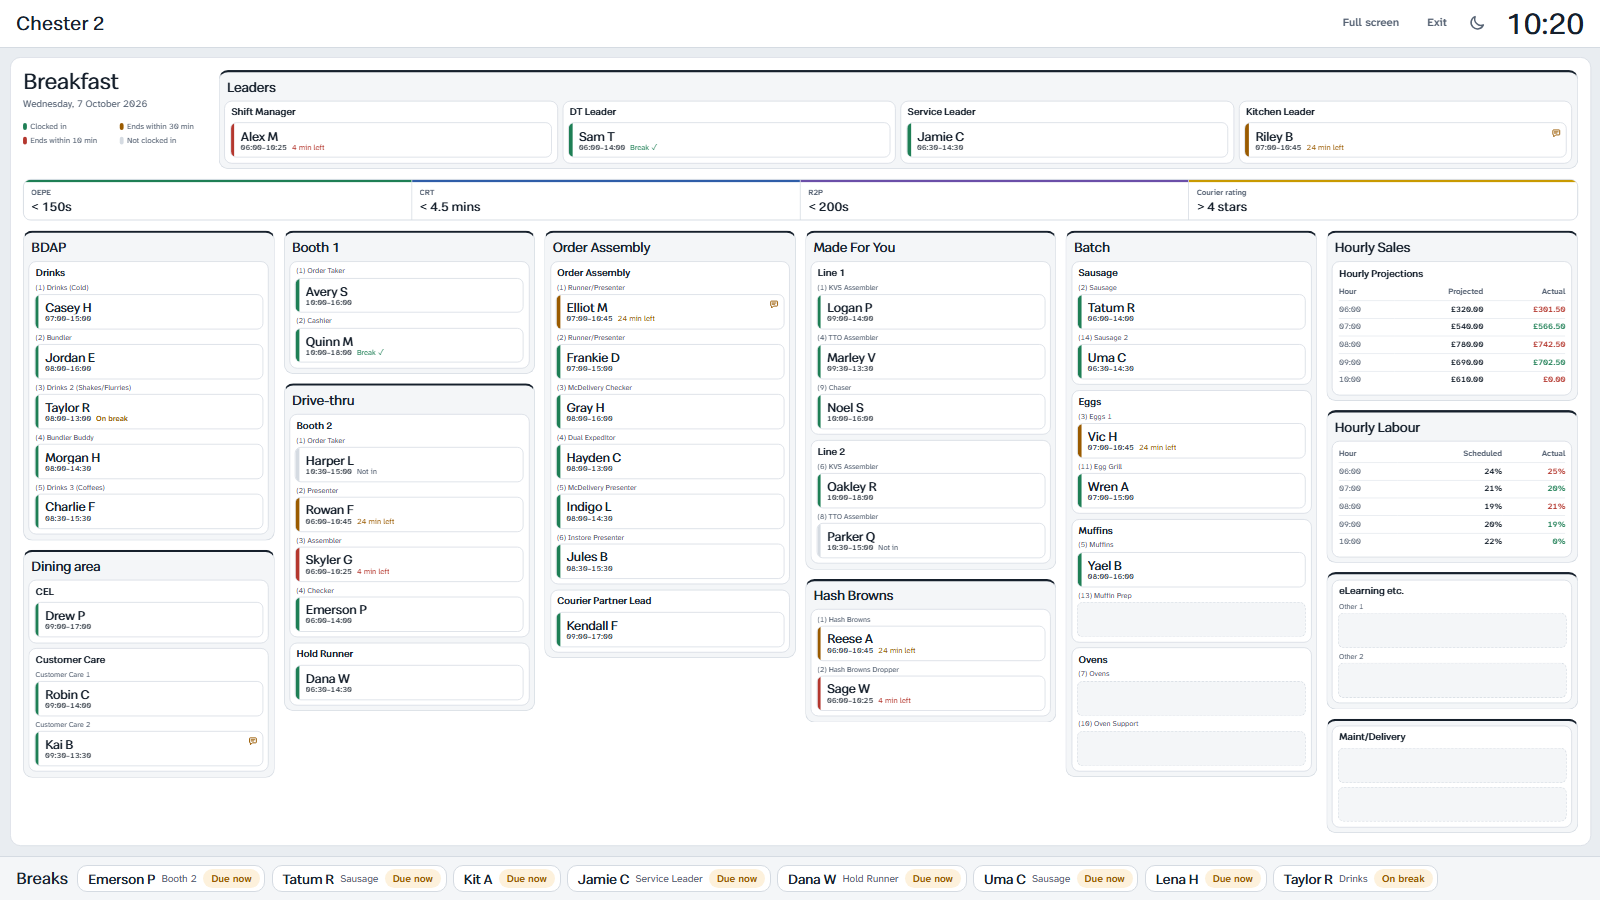
- It is read-only, so nobody can move people by accident. Changes made on another screen appear within a minute.
- It follows the day by itself: Breakfast until 11:00, Lunch until 16:00, Dinner after that, and Overnight in the early hours.
- It shows the time, shrinks to fit the screen without scrolling, keeps the display awake, and shows the next breaks along the bottom.
- Use Full screen to fill the display and Exit to go back. The buttons and mouse pointer hide after a few seconds and come back when you move the mouse.
- It uses the same store password as the floorplan.
Training Everyone
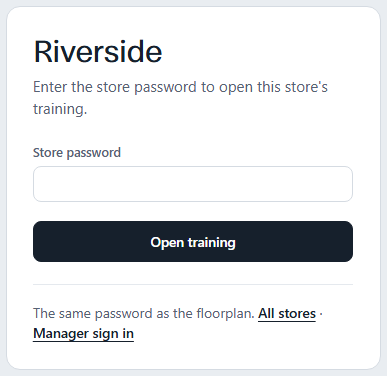
The Training pages turn the weekly MyTraining report into something you can act on: who has a verification overdue or coming up, how each crew trainer is doing, and where the biggest gaps are. Open them from Training in the main site menu (the home page and the admin pages), and enter your store's password. Once you're in, Take the tour (top right) walks you through the page. Collapse a section by clicking its heading (click again to open it), or use Collapse all / Expand all at the top right. Your choice is remembered on that device, and printing always shows every section.

The weekly report
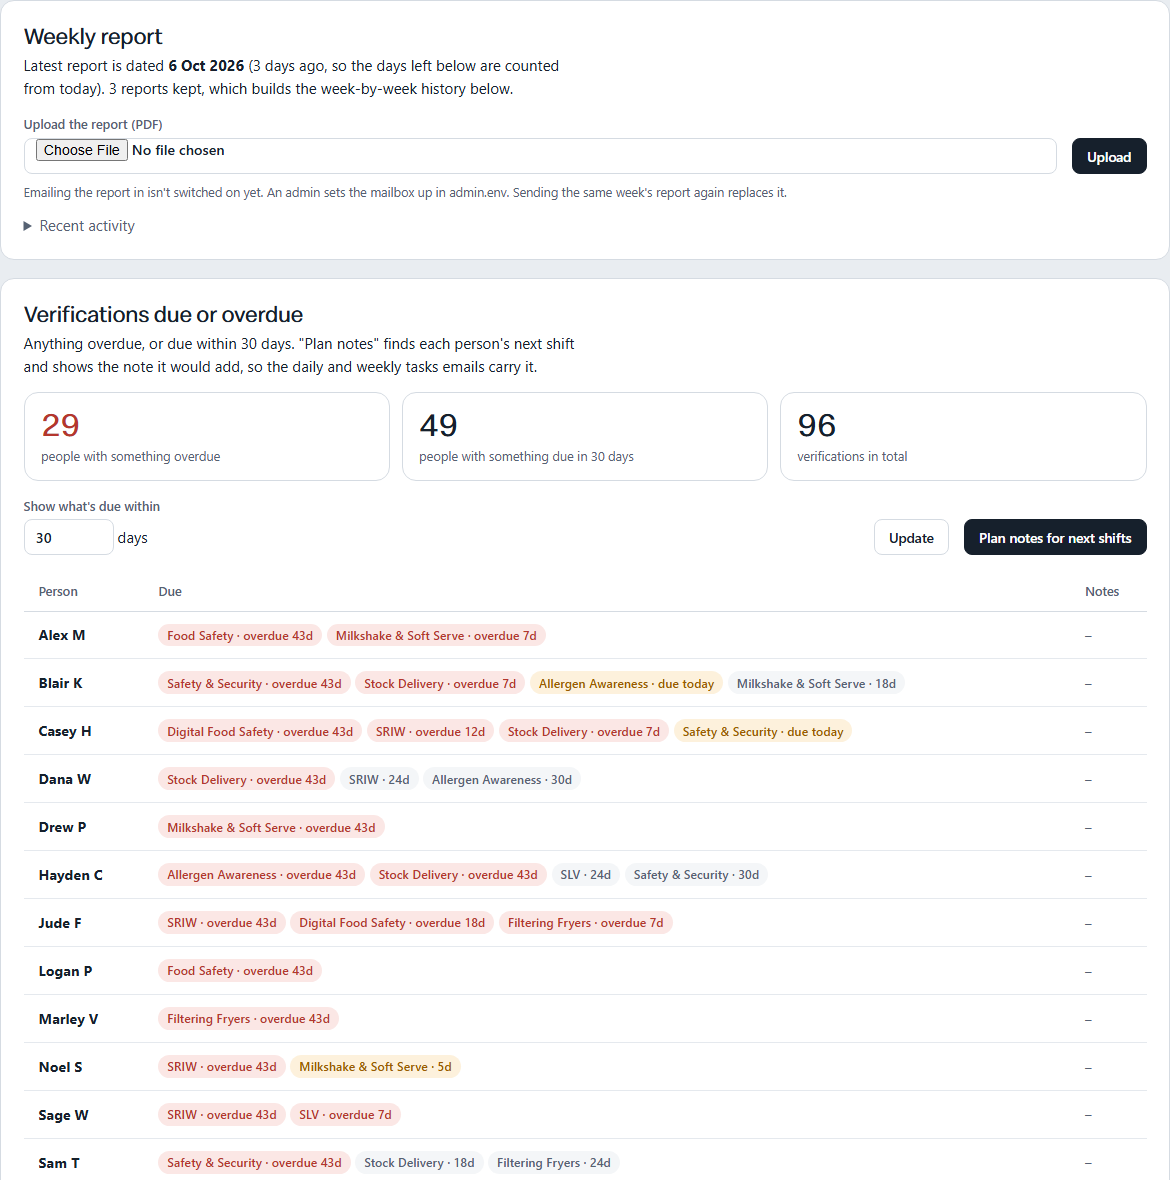
- Each week, send the MyTraining Reports - Restaurant PDF in. Either press Upload on the Training page, or email it to the training mailbox (if your admin has set it up).
- Every week's report is kept, so you can see how things change. Sending the same week again just replaces it.
- A report for a different store is refused.
Verifications due or overdue
- The list shows anyone with a verification overdue (red) or due within 30 days (you can change the 30). The days are counted from today, not from the report's date.
- The seven SRIW items expire together, so they are shown as one.
- The top boxes count the people and verifications involved.
Plan notes for next shifts
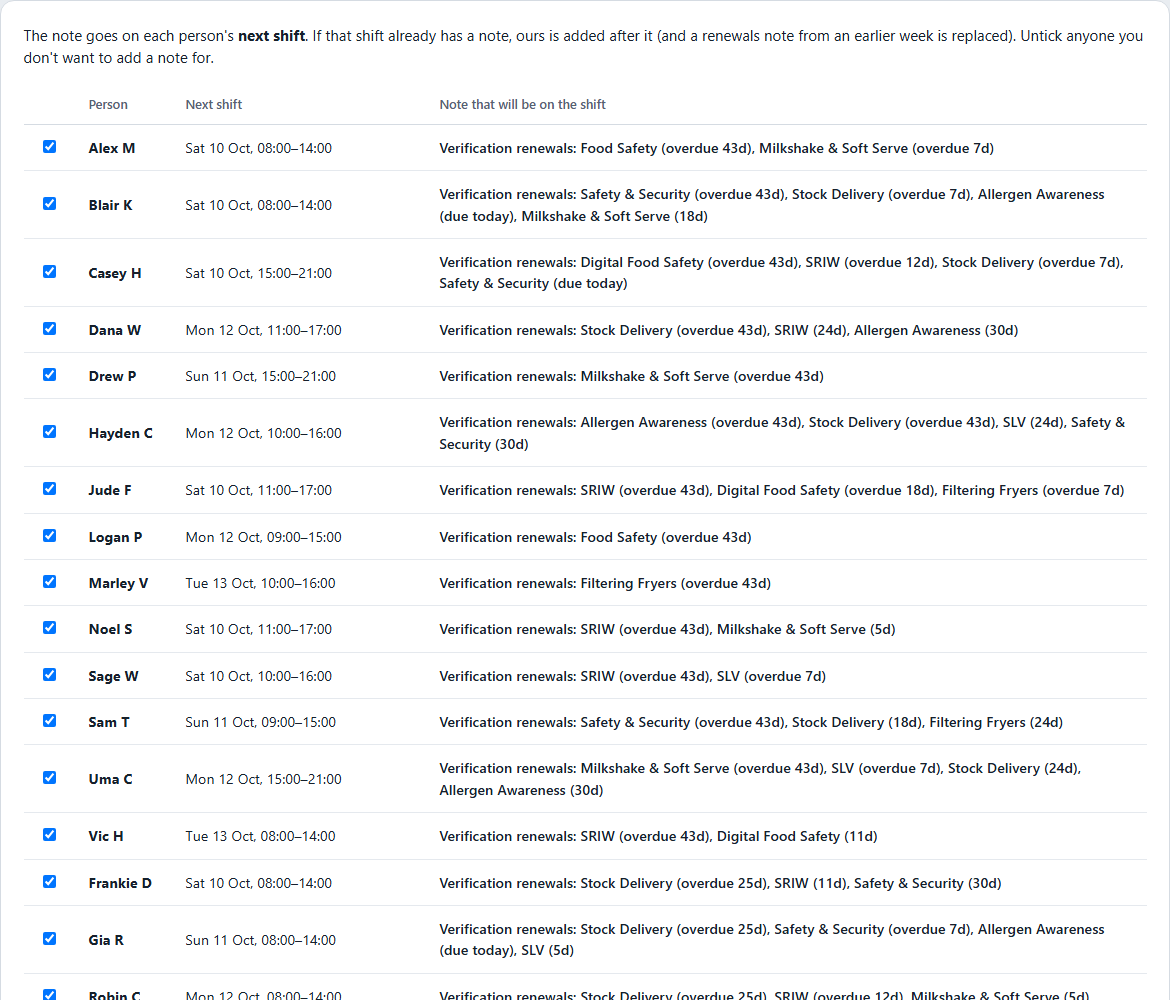
- Press Plan notes for next shifts. It finds each person's next shift in the coming 14 days.
- Check the list. For each person you see their next shift and the note that will go on it. Untick anyone you don't want.
- Press Add the ticked notes to LifeLenz and confirm.
- Notes look like Verification renewals: Food Safety (overdue 4d), Allergen Awareness (12d).
- If the shift already has a note, ours is added after it. A renewals note from an earlier week is replaced, so a shift never has two.
- Anyone who can't be placed is listed with the reason: Not matched (their name wasn't found in LifeLenz, or two people share it), No shift in the next 14 days, or the note would be too long.
- A name doesn't match? If LifeLenz uses a different name from the report (a preferred name, say), the person shows as Not matched. Choose their name from the list beside it and press Match. Names are shown as a first name and surname initial, with the likely ones (the same surname initial) at the top. ShiftTools remembers the choice for that store, for the Training and People notes alike, and from then on shows that LifeLenz name wherever the person appears on the Training and People pages (hover over it to see the name from the report). Press Remove if you chose the wrong person.
- Reading and adding notes take as long as LifeLenz does. Opening a plan shows a short Working out the plan page while ShiftTools reads the coming shifts and their existing notes, then the plan appears by itself. After you confirm, a progress page shows each note as it goes in, and it keeps going in the background, so it's safe to leave or close the page and it can't time out. If something stops part-way, open the plan again: anyone whose note is in shows Already there. The same goes for the People, HIG chat and new-starter plans.
- The notes then show on that day's floorplan and in the daily and weekly tasks emails, so the verification is planned in.
New starters' e-learning Everyone
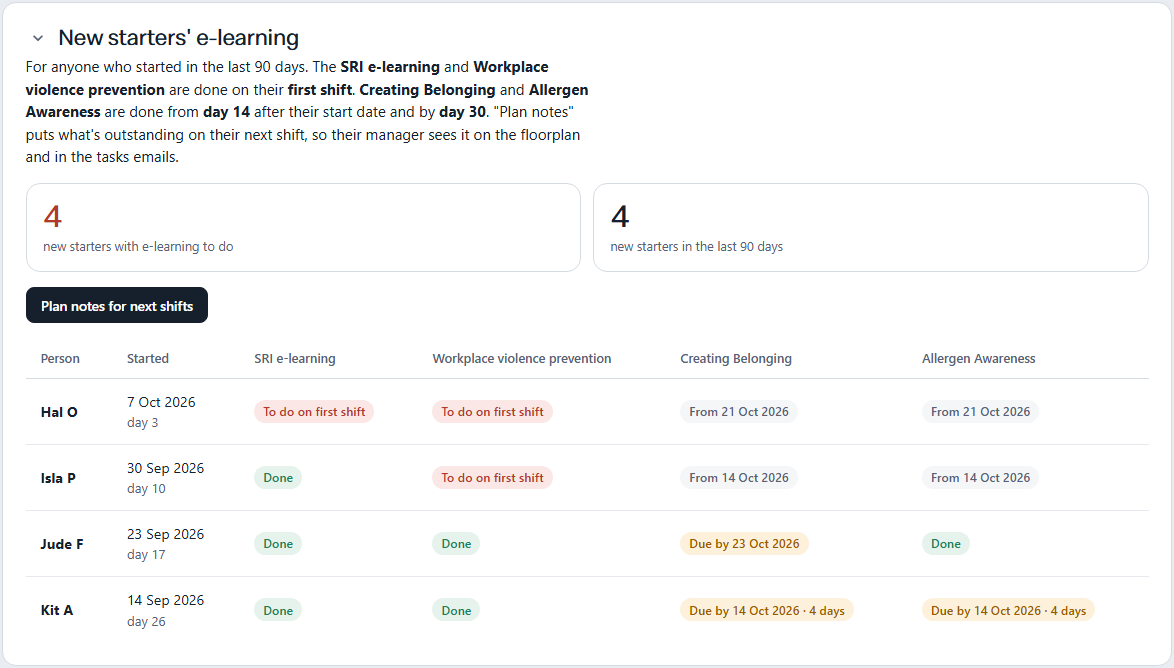
This lists everyone who started in the last 90 days, with four courses read from the report's course grids:
- SRI e-learning (the SRIW modules) and Workplace violence prevention are done on the person's first shift. While either is outstanding, it goes on their next shift.
- Creating Belonging and Allergen Awareness are done from day 14 after the start date and no later than day 30. Until day 14 the table says From that date. Then it says Due by the day-30 date, and Overdue once that has passed.
Plan notes for next shifts finds each new starter's next shift and shows the note it would add. Creating Belonging and Allergen Awareness only go on a shift that falls on or after day 14, so if their next shift is on day 12, the later shifts that week are checked and the note goes on the first one on or after day 14 (the first-shift courses still go on their next shift).
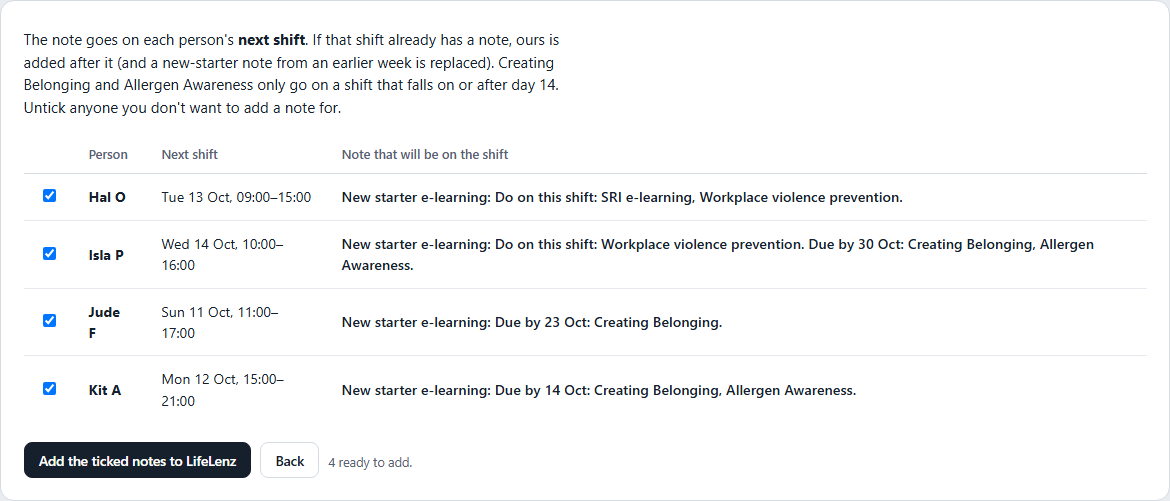
- Notes look like New starter e-learning: Do on this shift: SRI e-learning, Workplace violence prevention. Due by 24 Oct: Creating Belonging, Allergen Awareness.
- It works the same way as the renewals notes: added after the shift's own note, an earlier new-starter note is replaced, and other notes (renewals, on-boarding, HIG chats) are kept. If someone's name doesn't match LifeLenz, match it by hand as above.
- The report calls the allergen course Allergen Awareness. If a report was filed before ShiftTools read the course grids, the section asks you to upload it again.
- With Add the notes automatically switched on (admins), these notes are added too when a new report arrives.
Crew trainers
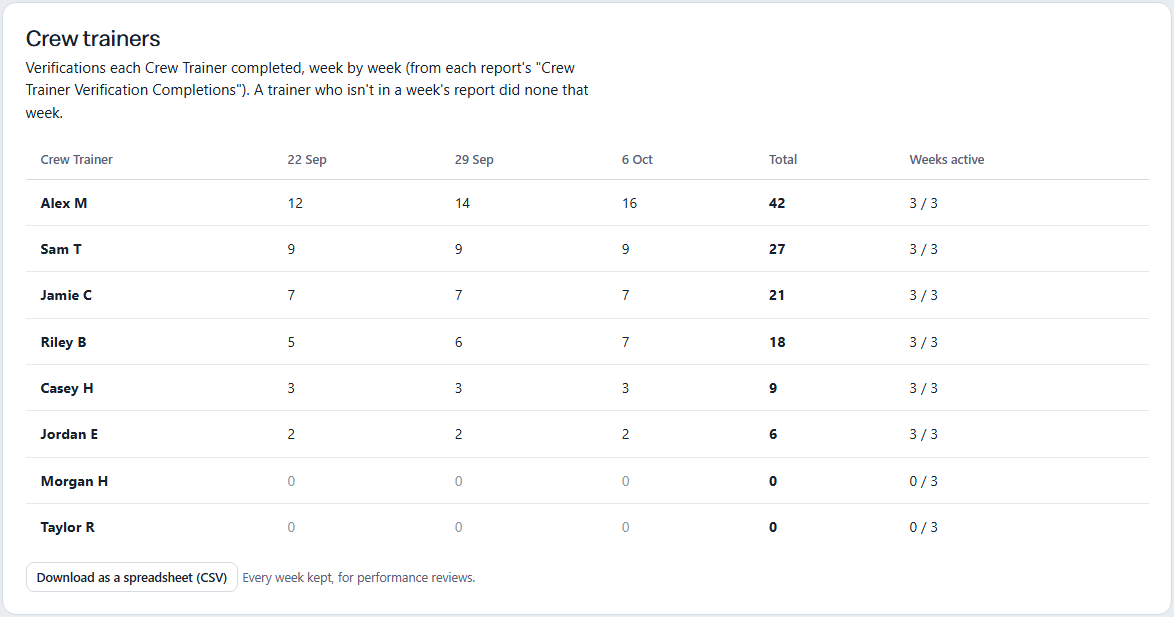
This shows how many verifications each Crew Trainer completed in each weekly report, with totals and how many weeks they were active. A trainer who isn't in a week's report did none that week, which shows as 0. Download as a spreadsheet gives every week kept, for performance reviews.
Opportunities
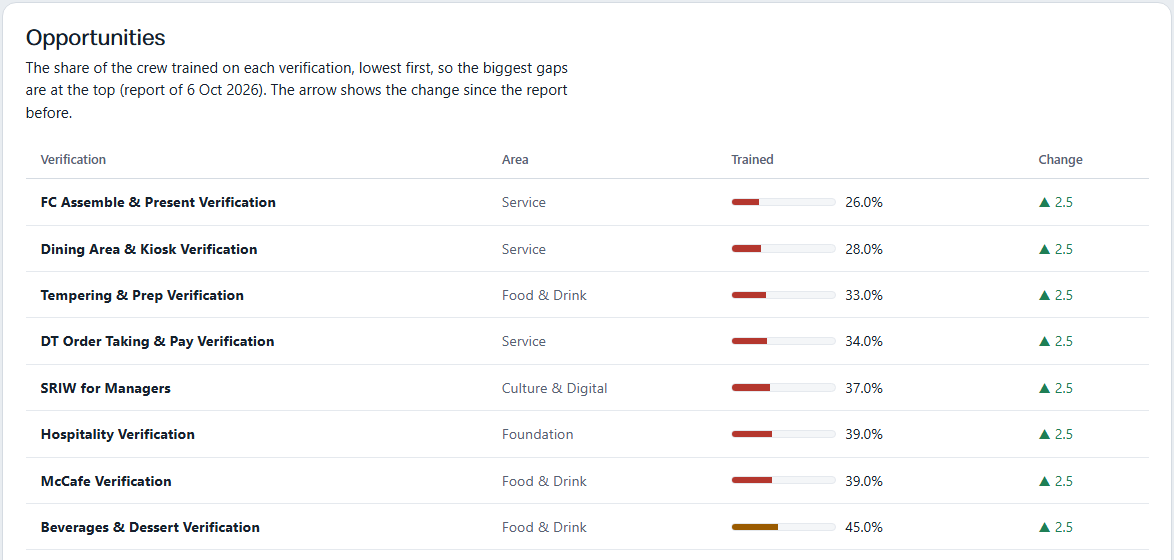
The share of the crew trained on each verification, lowest first, so the biggest gaps are at the top. The arrow shows the change since the report before. A low bar is a verification worth putting people forward for.
Automatic notes Admins
An admin can switch on Add the notes automatically when a new report arrives for a store. Use the manual plan for a few weeks first, so you can see what it does.
People Everyone
The People pages turn the weekly Hiring & Turnover report into something you can act on: how turnover is moving, who is still on-boarding, where recruitment has got to, and who has left. They work like the Training pages: open People in the main site menu, choose your store and enter its password. Take the tour (top right) walks you through the page. Like the Training page, each section can be collapsed by clicking its heading, or all at once with Collapse all / Expand all, and your choice is remembered.

The weekly report
- Each week, send the Hiring & Turnover PDF in. Press Upload on the People page, or email it to the same mailbox as the training report. The report says what kind it is, so it doesn't matter which page or mailbox you use.
- Every week is kept, which builds the history. Sending the same week again replaces it. A report for a different store is refused.
At a glance
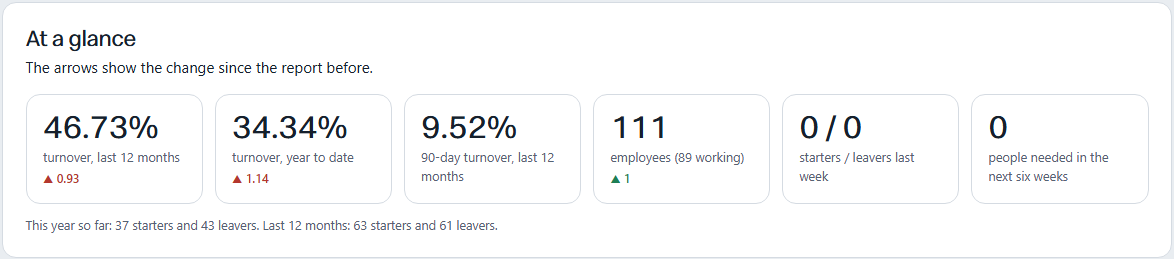
The tiles show turnover over the last 12 months, this year so far and the last 90 days, how many people you employ (and how many are working), last week's starters and leavers, and how many people the report says you need to hire in the next six weeks. An arrow shows the change since the report before. Turnover going up shows in red, because it means more people are leaving.
Week by week
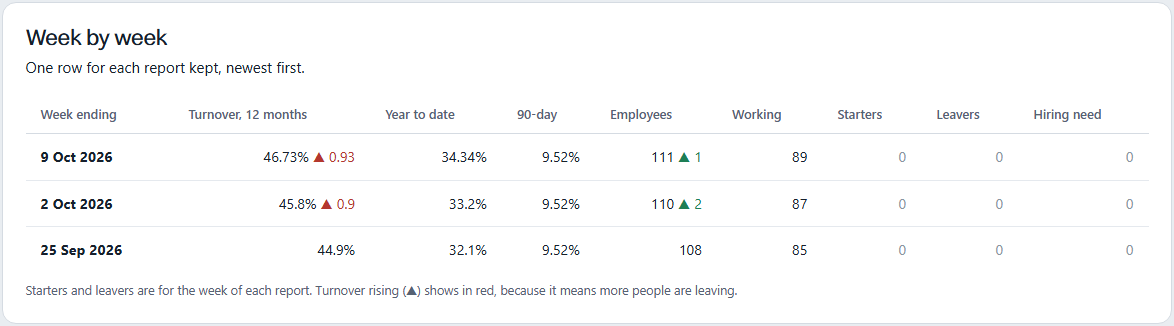
One row for each report, so you can follow the trend. It starts with a single row and fills in as each week's report arrives. Below it, By occupation group breaks the staff and turnover down for crew members, crew trainers, the dining area and the rest, with the report's own forecast of leavers.
New starters and on-boarding
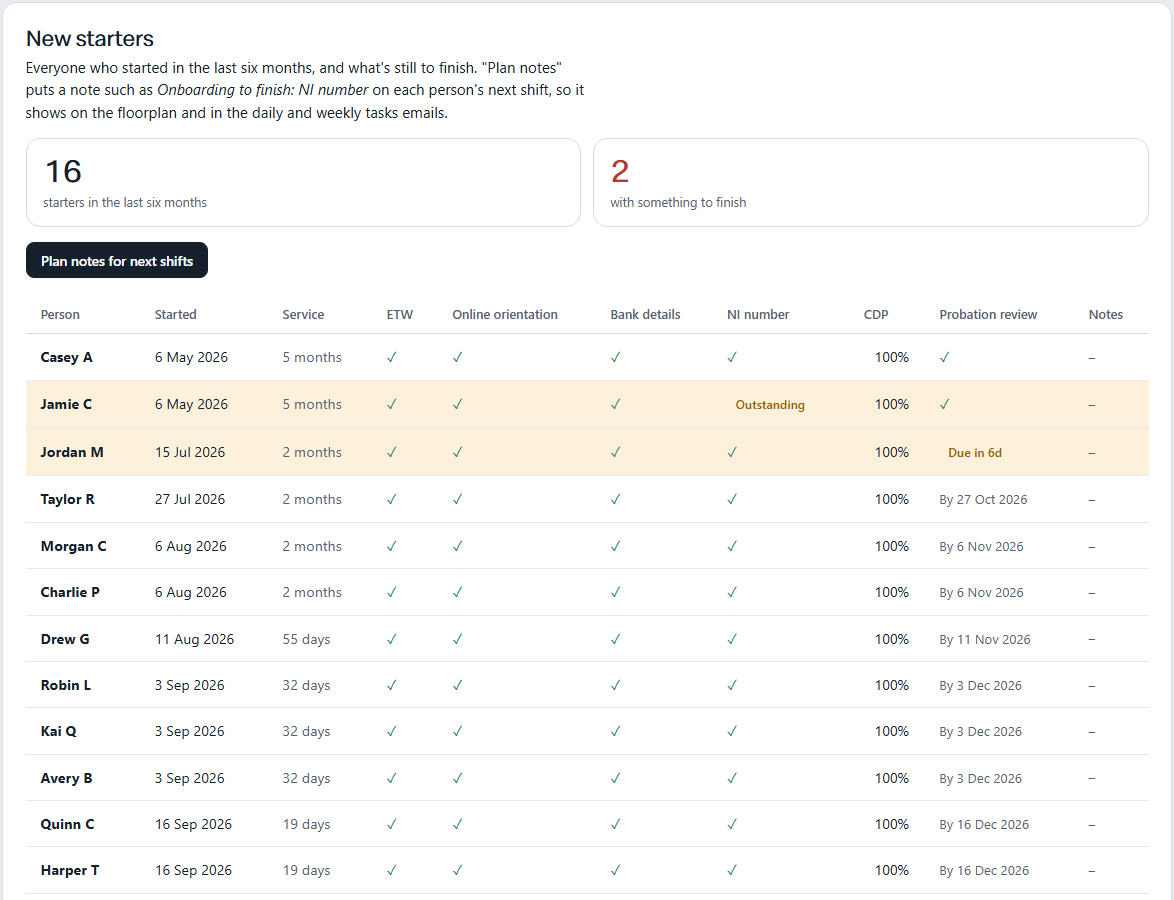
Everyone who started in the last six months, with a tick for each thing that's done and Outstanding for each that isn't: ETW, online orientation, bank details, NI number and CDP (the names are as in the report), plus the probation review, which shows the date it's due. Anyone with something to finish, or a review due soon, is shaded.
- Press Plan notes for next shifts. It finds each of those people's next shift in the coming 14 days.
- Check the list. For each person you see their next shift and the note that will go on it, such as Onboarding to finish: NI number. Untick anyone you don't want.
- Press Add the ticked notes to LifeLenz and confirm.
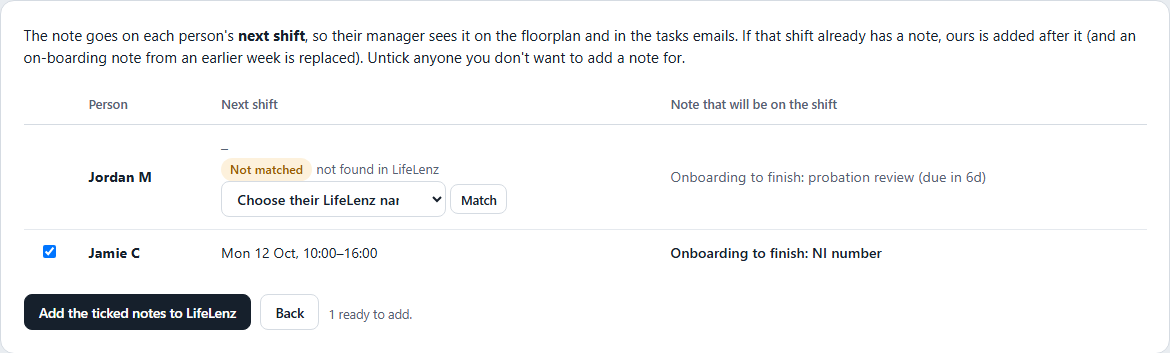
- If the shift already has a note, ours is added after it. An on-boarding note from an earlier week is replaced, so a shift never has two.
- Anyone who can't be placed is listed with the reason, in the same way as on the Training page. If someone shows as Not matched because LifeLenz uses a different name (a preferred name, say), choose their LifeLenz name from the list beside them and press Match. It's remembered for the store, used for the Training notes too, and their LifeLenz name is then shown wherever they appear on these pages.
- The notes show on the floorplan (a yellow tile) and in the daily and weekly tasks emails.
- Probation review. A probation review is due within the first three months of employment, so its due date is three months after the start date. The table shows that date for everyone whose review the report doesn't show as done: grey while it's a way off, amber once it's due soon, and red once it's overdue. From 14 days before the due date it goes into the person's note, as Onboarding to finish: probation review (due in 6d), and carries on, as (overdue 5d), until the report shows the review as done. Under the table you can change how many days ahead it starts, or untick the box to leave probation reviews out of the notes.
- An admin can switch on Add the notes automatically when a new report arrives. Use the manual plan for a few weeks first, so you can see what it does.
HIG chats
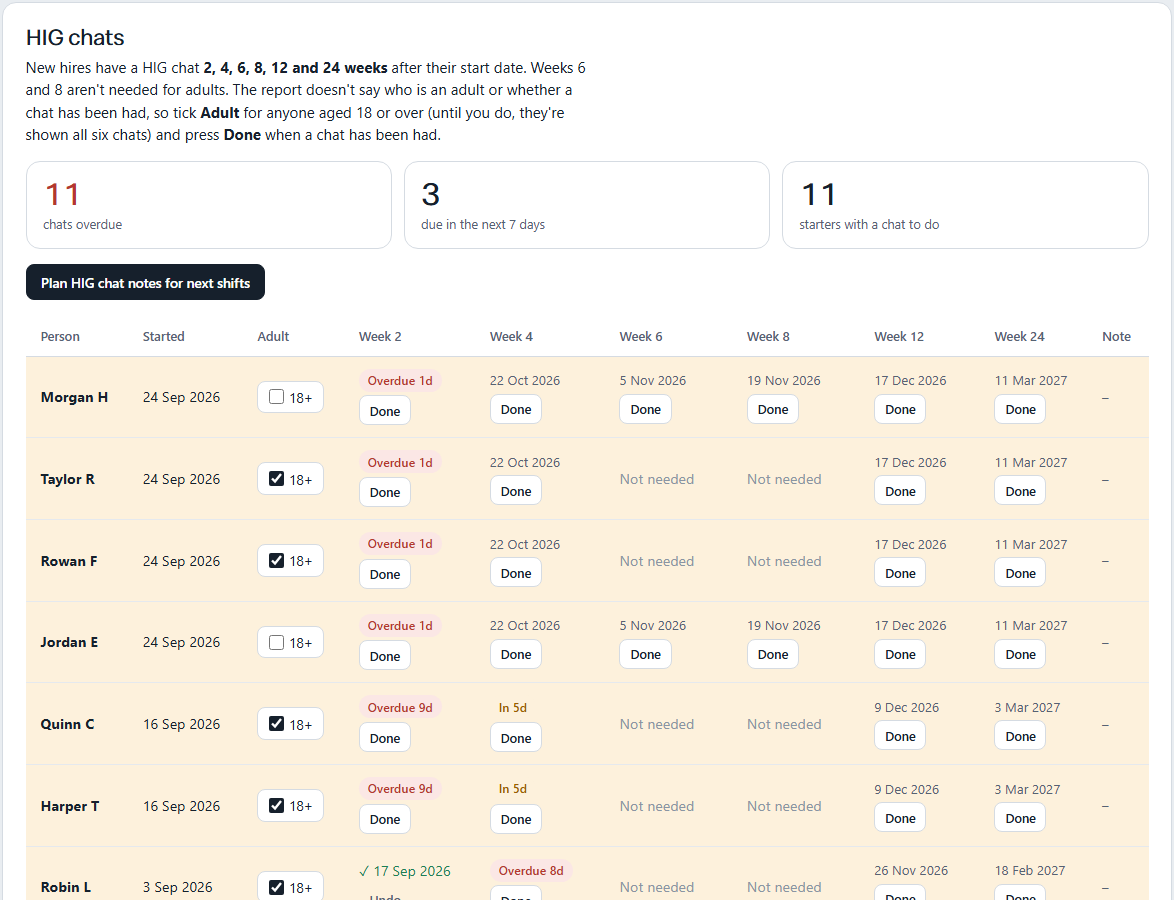
New hires have a HIG chat 2, 4, 6, 8, 12 and 24 weeks after their start date. Weeks 6 and 8 aren't needed for adult workers. Each starter has a row, with the date of each chat (their start date plus whole weeks).
- The report doesn't say who is an adult, or whether a chat has been had, so you tell ShiftTools. Tick 18+ for anyone who is an adult, which takes weeks 6 and 8 off their list. Until you do, everyone is shown all six chats, because missing one for a young worker is the worse mistake.
- Press Done when a chat has been had. It's recorded with that day's date. Undo takes it back if you pressed it by mistake.
- Red means overdue, amber means due within the next few days (seven to start with), and grey is later. The three boxes at the top count them.
- Press Plan HIG chat notes for next shifts. It finds each starter's next shift in the coming 14 days.
- Check the list. Each person gets a note such as HIG chat due: week 4 (overdue 3d). A chat can't be had before the day it falls due, so the note only goes on a shift on or after that day. If their first shift of the week is too early, ShiftTools looks at their later shifts that week (Monday to Sunday) and puts the note on the first one on or after the due day. The plan shows which shift it chose. Only if none of that week's shifts is late enough do they show as Not due yet and get nothing this time; the next week's plan picks them up. The days in the note are counted from that shift (today on the day it is due). Untick anyone you don't want.
- Press Add the ticked notes to LifeLenz and confirm.
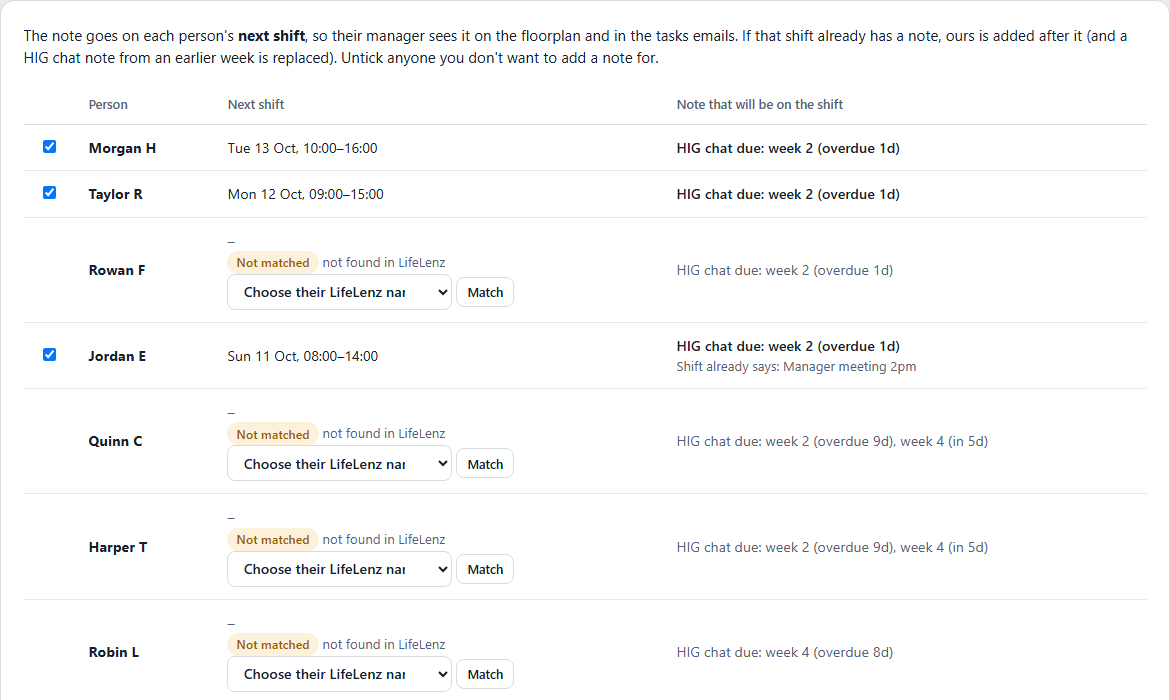
- The note goes on the next shift, so it shows on the floorplan (a yellow tile) and in the daily and weekly tasks emails. If the shift already has a note, including an on-boarding note, ours is added after it. A HIG chat note from an earlier day is replaced, so a shift never has two.
- You can change how many days before a chat is due that the note starts to appear (Put a note on the next shift from ... days before a chat is due).
- Setting this up for the first time? Open Setting this up? Mark earlier chats as had below the table, choose a date, and every chat that fell due before it is marked as had. Anything you didn't have stays overdue until you press Done, and each one can be undone.
- An admin's Add the notes automatically when a new report arrives adds the HIG chat notes as well as the on-boarding ones.
Recruitment
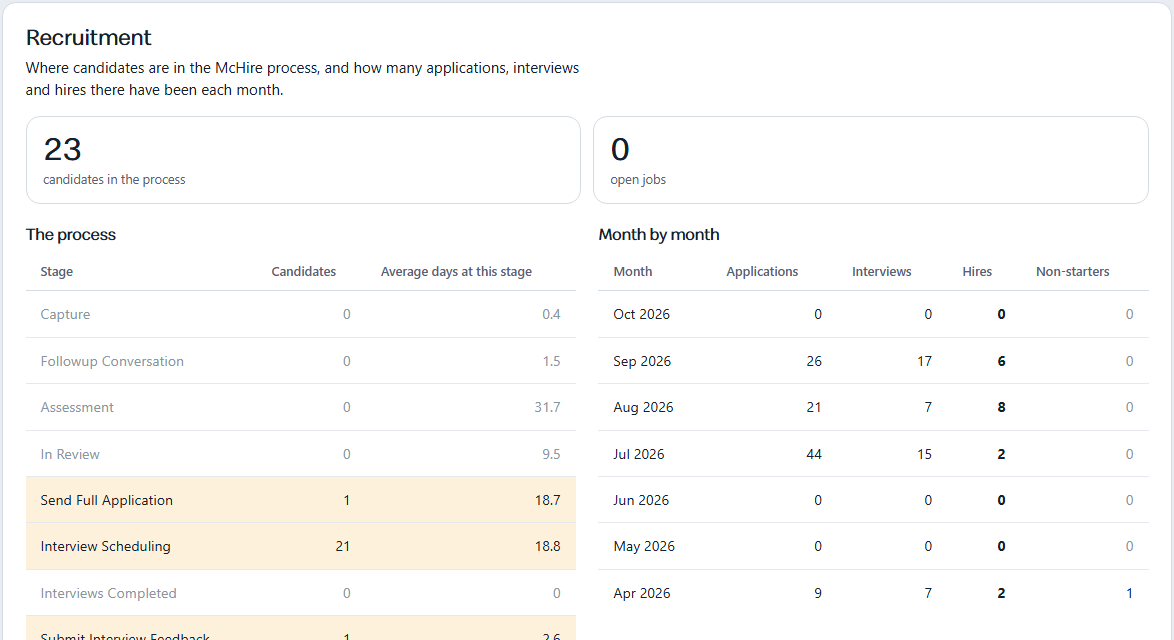
How many candidates are at each stage of the McHire process and for how many days on average (stages with someone in them are shaded), and the applications, interviews and hires for each month, with the most recent month first.
Leavers, transfers and job changes
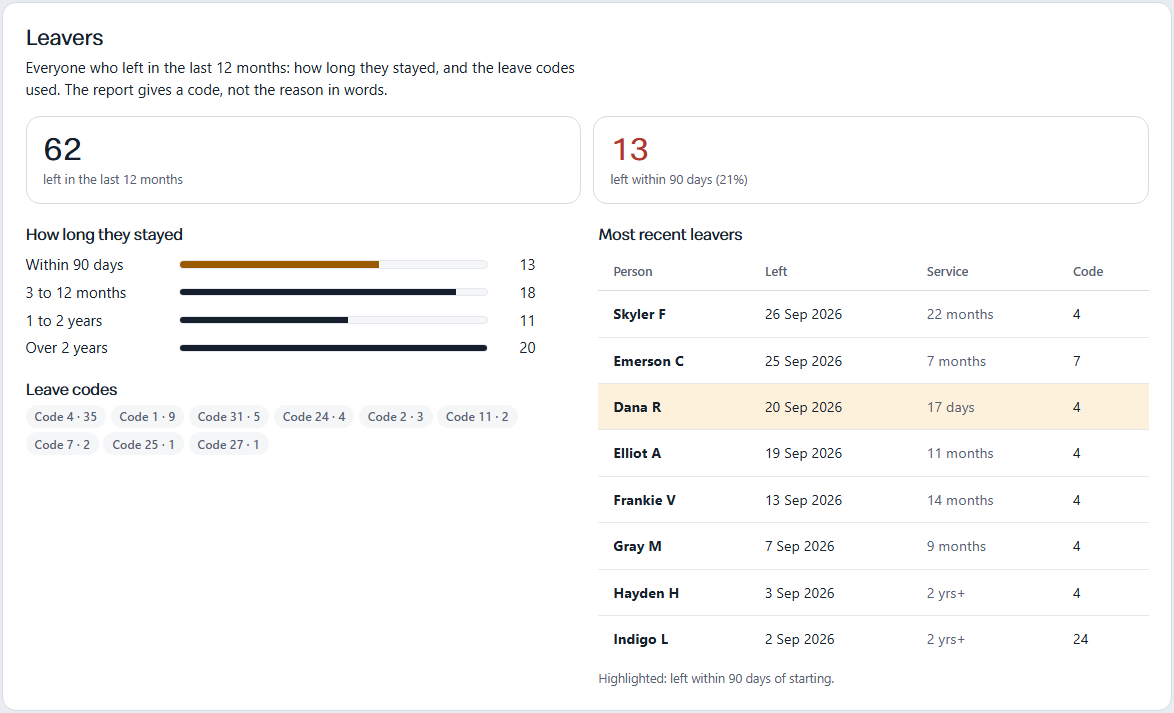
Everyone who left in the last 12 months: how long they stayed, how many left within 90 days of starting, the leave codes used (the report gives a code, not the reason in words), and the most recent leavers. Anyone who left within 90 days is shaded. Below that are the people who transferred in or out of the store and who changed job, over the last year.
Tasks Managers
A to-do list for your store's managers. Give out tasks, hand them over, plan each manager's days around their shifts, and follow up on what is done. You sign in with a manager account to use it, but the managers who are given tasks don't need accounts: you pick them from LifeLenz. Find it under Tasks on your store's bar. Press Take the tour on the page for a one-minute walk through.
My week
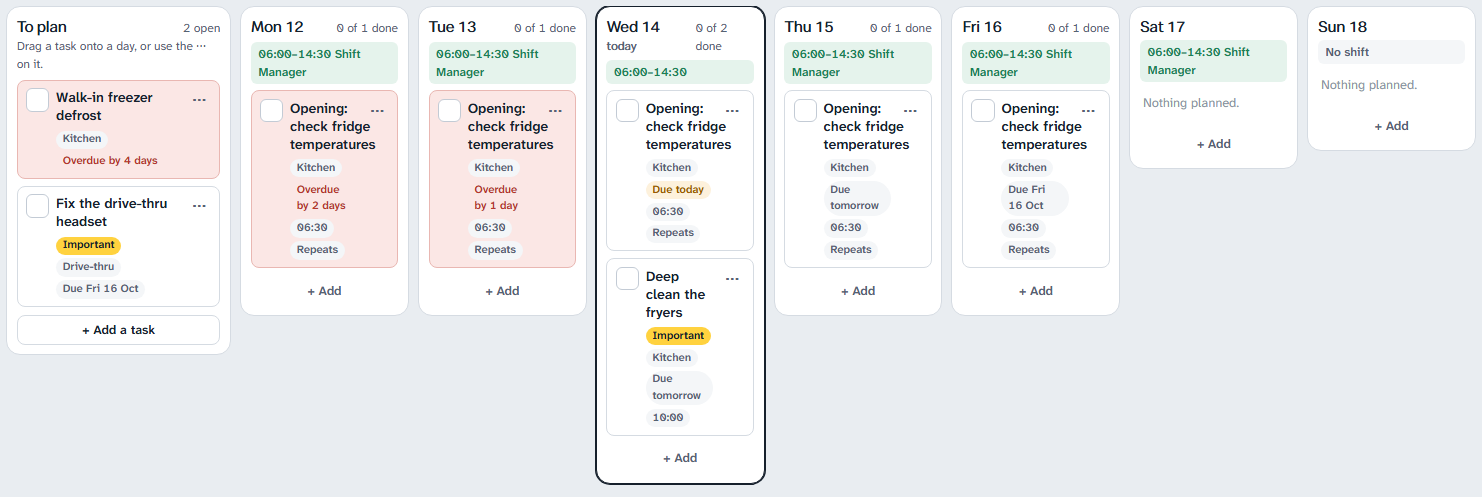
- Pick any manager at the top right to see their week. Use the arrows to move between weeks.
- To plan holds open tasks that haven't been given a day. Tasks handed to you land here. Overdue ones are red and come first.
- Drag a task onto a day to plan it, and drag it back to unplan it. On a phone, use the ··· on the task and choose a day (and a time if you like).
- The green line at the top of each day is that manager's shift from LifeLenz, so you can see how much time they really have. It arrives a moment after the page opens. If LifeLenz is slow, your tasks are still there and a note offers to try again.
- Tick the box when a task is done. Click the title to edit it. + Add on a day adds a task straight to that day.
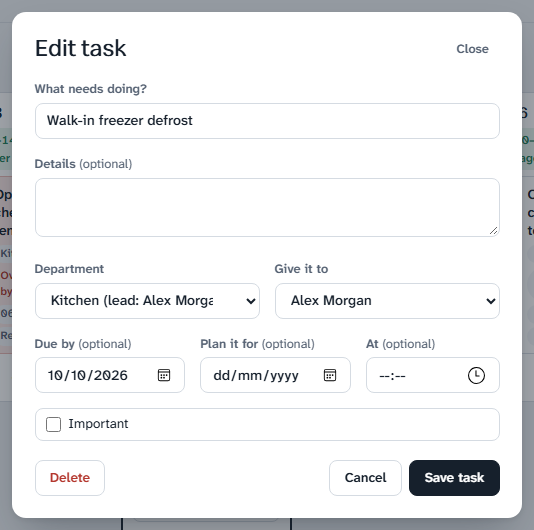
When you make a task, choose a department and, unless you name someone, it goes to that department's lead. You can also give it a due date, plan it for a day and time, and mark it Important.
Handing a task to someone else
Open the ··· on a task and choose Hand over to. It leaves your week and lands in theirs, saying who handed it over. They plan it for their own day, so the day you had planned is cleared. A department lead can use this to give the department's tasks to the right person on shift.
Team
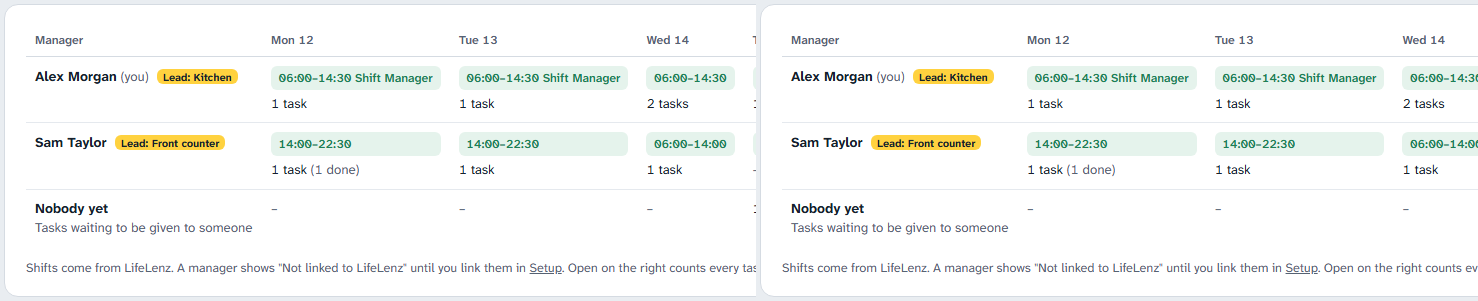
A row for each manager with their shift each day and how many tasks they have on it, and how many they still have open. Press a manager's name to open their week. The bottom row counts tasks that haven't been given to anyone yet.
Follow-up
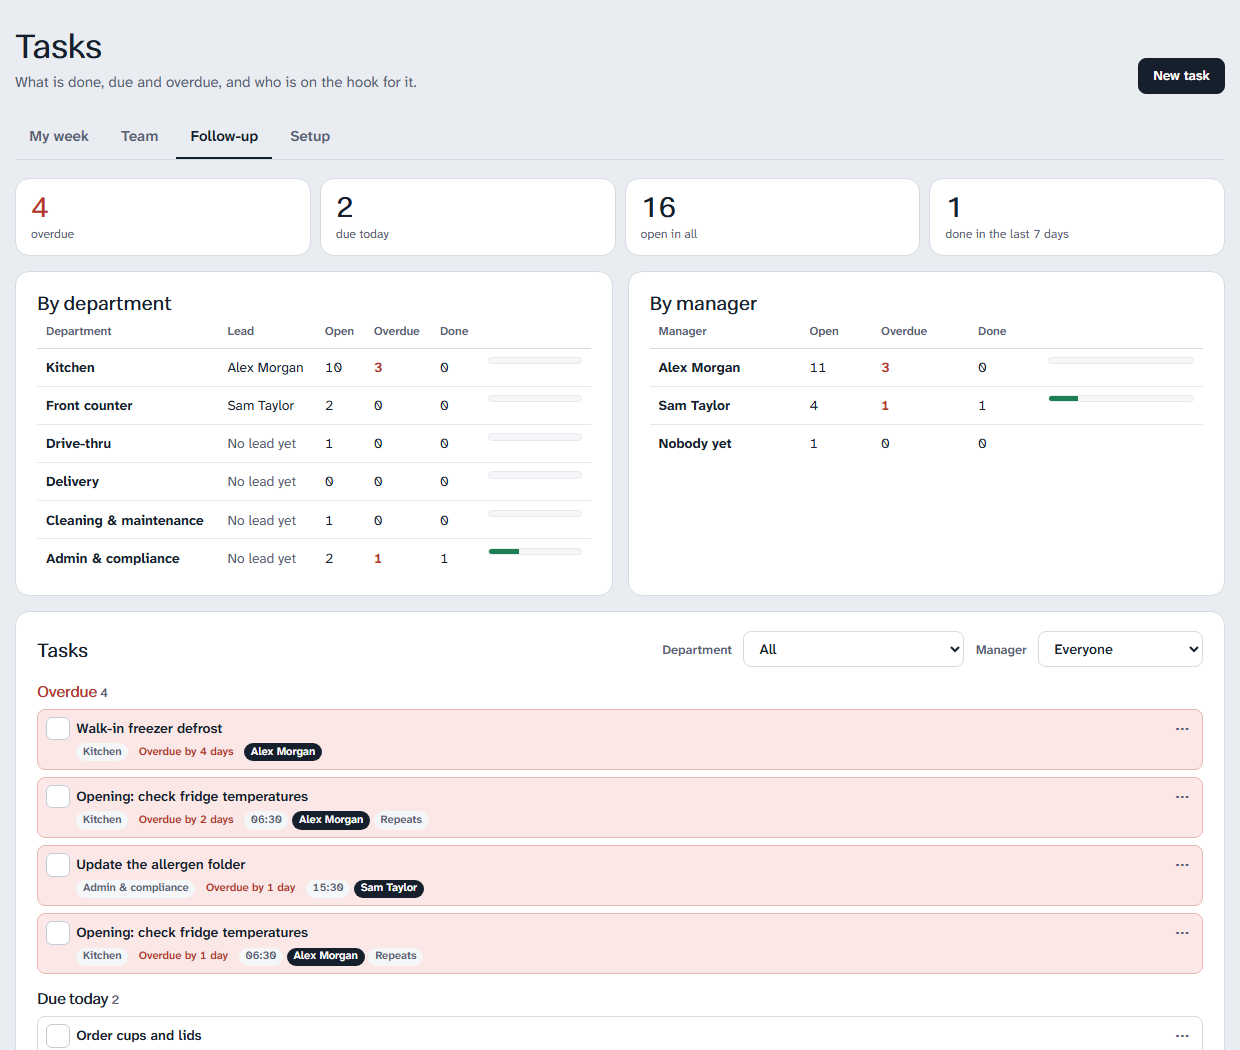
The numbers at the top show what is overdue, due today, open in all, and done in the last 7 days. By department shows each department's lead, how many tasks are open and overdue and how many are done, with a bar. By manager does the same for each person. Press a department or a name to see just their tasks. Below, the tasks are grouped as Overdue, Due today, Coming up, No date and Done in the last 7 days, and you can tick, plan or hand over from there.
Setup
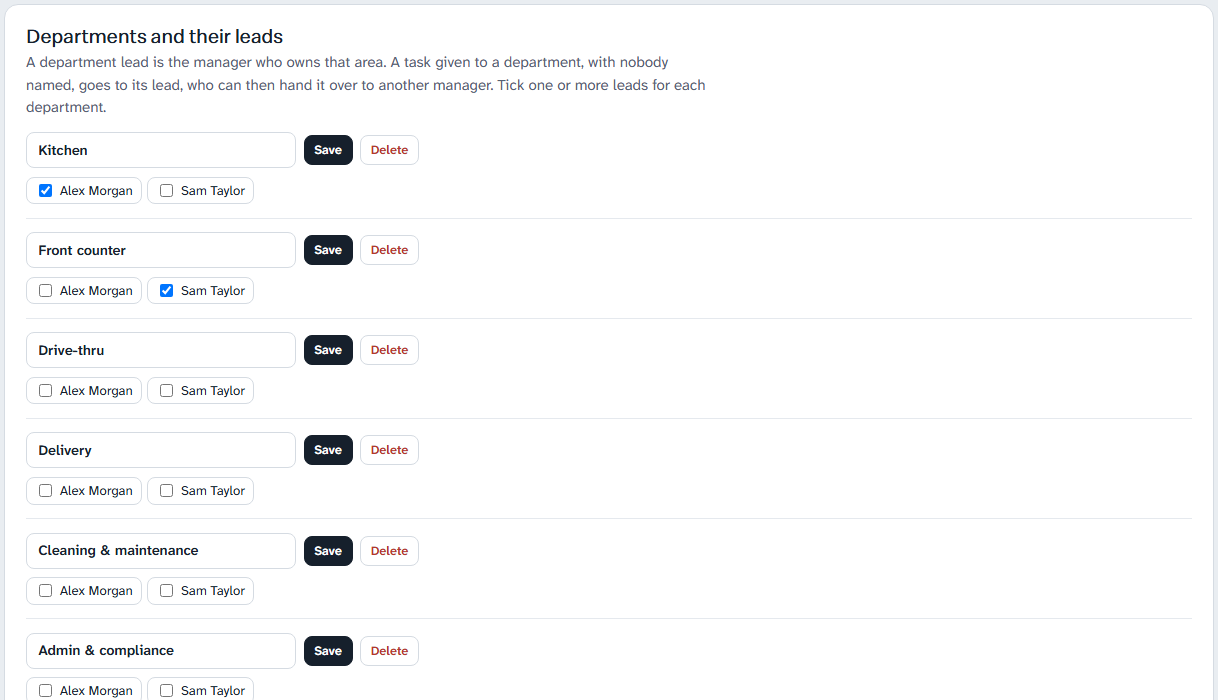
- Departments and leads. A store starts with Kitchen, Front counter, Drive-thru, Delivery, Cleaning & maintenance and Admin & compliance. Rename them, add your own, and tick one or more managers as each department's lead. A department's lead is who gets its tasks and is accountable for them on the Follow-up page.
- Repeating tasks. For jobs that come round every week, such as the opening checks: choose the days, the department and a time. A copy appears on each of those days, already planned for that day, in the manager's week. You can pause or stop a repeating task. Stopping removes the copies from today on that are still open and keeps everything already done.
- Managers. Pick each manager from your LifeLenz staff list and press Add. They don't need a ShiftTools account. That is how their shifts appear on their week. Do this first, as departments, tasks and the Team view all use this list.
Tasks are kept for each store separately, and only managers of that store (and admins) can see or change them.
Finance Managers
Two tools that replace the workbooks: the daily sales and labour tracker and the P&L log. Find them under Finance on your store's bar. Each store's figures are kept separately, and only managers of that store (and admins) can see or change them. Press Take the tour on either page for a one-minute walk through.
Sales & labour
- The page shows one month with a row for every day. Fill in last year's sales, the projected sales and scheduled labour £ ahead of time, then the actual sales and actual labour £ each day. The percentages, and how you did against projection and last year, work themselves out as you type.
- Transfers in is labour £ for crew from another store who worked in yours, and Transfers out is labour £ for your crew who worked in another store. Actual labour % counts your actual labour plus transfers in, less transfers out, so it reflects what was really spent on your sales.
- For a quick end-of-day entry use Enter a day at the top. It starts on yesterday. For catching up or planning ahead, type straight into the grid and press Save. A blank box clears that figure. You can type £ signs and commas.
- The boxes at the top show the month so far: only days with actual sales count, so labour % and sales against projection are fair however far through the month you are.
- Download Excel saves the month as a workbook. At the bottom of the page you can choose the organisation's Sales Tracker workbook and the month it is for, and read it in so you don't type it twice. It reads this store's figures and replaces those for the days it contains.
All stores
Supervisors and anyone who looks after more than one store get an All stores tab. It shows each store's month so far side by side with a total, flags stores whose yesterday's figures aren't in, shows any one day for every store, and a day-by-day grid of any measure (such as actual labour %).
P&L log
- One row for each account: Food, Paper, Operating supplies, Promotion, Outside services, Travel, Linen, M&R Building, M&R Equipment, M&R IT, HVAC, Miscellaneous, Office and Utilities. Open one to add its invoices, accruals (charges awaiting an invoice), monthly prepayments, other charges (a credit is a minus amount) and transfers. Press Edit on a line to change or delete it.
- The charge is worked out as in the workbook: invoices, prepayments, other charges and this month's accruals, plus transfers in, less transfers out, less last month's accruals, which come forward by themselves so nothing is counted twice.
- Food and Paper are costed from stock: opening stock (last month's closing, filled in for you) plus the charge, less closing stock from the Ops report. Their percentage is of the month's actual sales.
- Type a budget on the account or in the list and it carries on to the following months until you change it. Remaining shows what is left.
- The first month you use it, add any previous accruals by hand under Previous months' accruals. Download Excel saves the whole month.
- The accountant's store charges. At the bottom of the P&L log, choose the store charges workbook the accountant sends and press Read it in. The month is taken from the file, and each account's invoices, accruals, prepayments, transfers and opening and closing stock are filled in. Every account is checked against the accountant's own total and anything that doesn't match is listed. Labour, payroll, delivery commission and other ledger lines that aren't accounts in the log are left out. Reading the same file again replaces what it added and leaves lines you typed alone.
For managers Managers
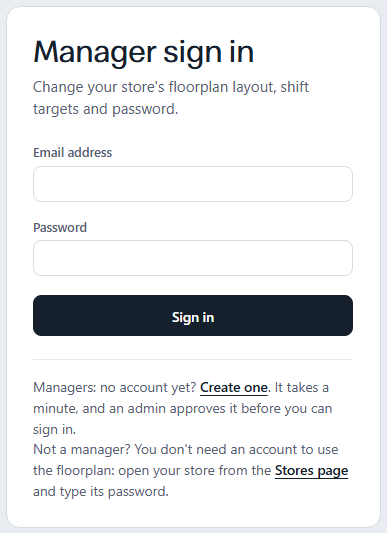
Sign in with your email address (Manager sign in). Then the Edit layout cog and Store settings are yours to use for your store.
Editing the layout
The layout is the set of stations and positions on the floorplan. Press the cog (Edit layout) next to Print and Screenshot on the floorplan. The page switches to the layout editor, and a bar with Discard changes, Save and Close appears at the top.
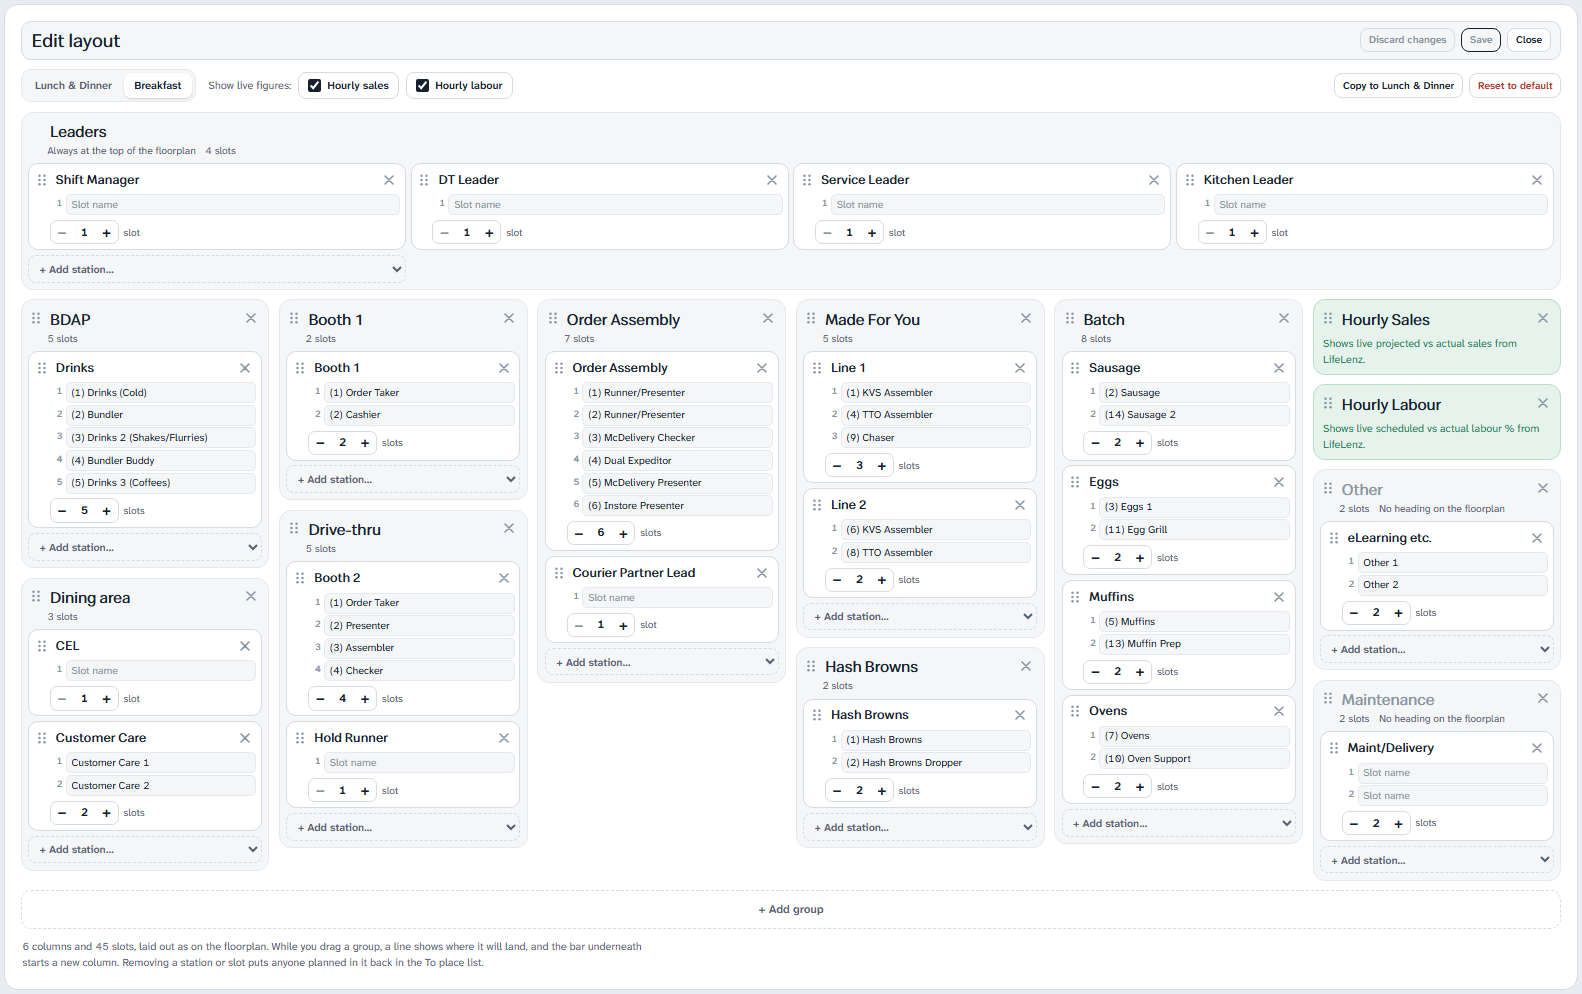
- There are two layouts: Breakfast, and Lunch & Dinner (which Dinner and Overnight use too). Switch between them with the tabs. The editor opens on the one for the shift you were looking at.
- Groups (such as "Made For You") are boxes on the floorplan. Drag a group by its handle (the dots) to another column, or to Drop here to start a new column. A blue line shows where it will land.
- In each group, stations hold positions. Type over a name to rename it. Use the minus and plus to change the number of positions (1 to 20), and type a name for each position, such as "Order Taker".
- + Add station offers the standard stations, grouped by Breakfast and Lunch & Dinner (ones already in use are greyed out), or a blank Custom station. Standard stations keep working with Auto-assign.
- + Add group makes a new group. Leave its heading blank to show none. The cross removes a group or station and asks you to confirm.
- Hourly sales and Hourly labour tick boxes show or hide those tables.
- Copy to ... copies this layout to the other tab. Reset to default goes back to the standard layout (it asks you to click again).
- Removing a station or position puts anyone planned there back in the To place list. Leaders always stay at the top.
- Press Save. The new layout shows straight away on every screen. Close asks you to confirm if you have unsaved changes.
The same editor is on the Store settings page, if you prefer to work there.
Store settings
From the floorplan press Store settings, or from the Stores page press the store's Settings, or choose Settings on the store's bar. Press Take the tour at the top right for a one-minute walk through it. The page has:
- Floorplan layout: the editor above.
- Shift targets: the four targets across the top of the floorplan (name, target and colour) and the focus actions shown on the Shift targets view.
- Daily shift notes email: see the daily tasks email.
- Sickness and absence marking (admins): switch the mark sick buttons on or off for the store.
- Password and LifeLenz: the floorplan password and the LifeLenz connection.
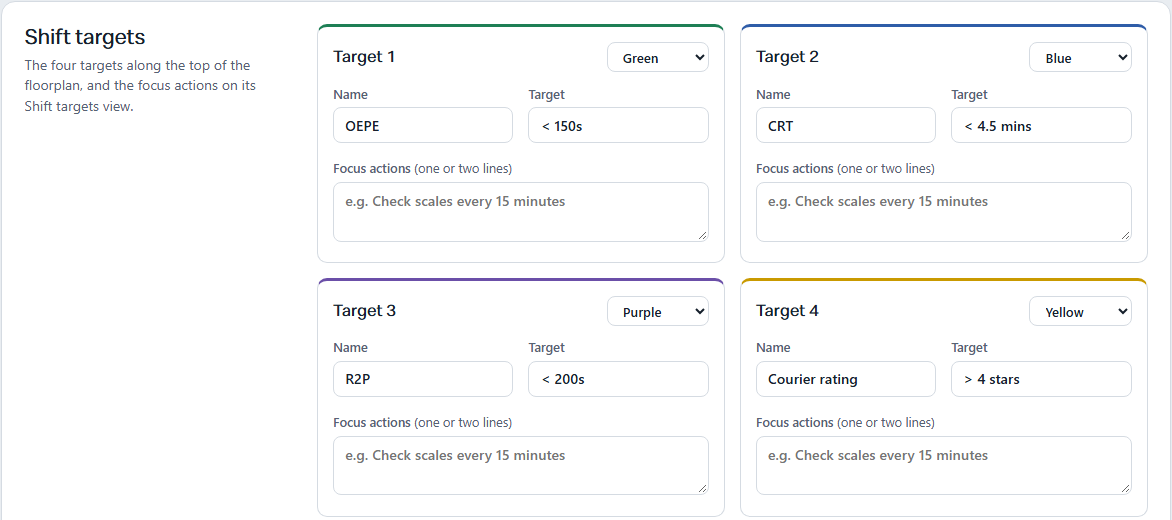
The floorplan password
Under Password and LifeLenz, type the password crew use and press Save password. It is the same password for the floorplan and the Training pages. Change it when someone leaves, and tell the team. A store with no password is open to anyone with the link, and its Training pages need a manager login.
Connecting LifeLenz
At a glance: on the Stores page, everyone can see under each store whether LifeLenz is connected (green), not connected (red) or not checked yet (grey). It's checked every 30 minutes. Each store also has a Reconnect button. For a manager of that store (or an admin) it opens these same steps. For anyone else it asks them to sign in as a manager first, or to ask the store's manager.
ShiftTools reads shifts from LifeLenz with a sign-in token that you hand over from your own LifeLenz sign-in (below). By default it is not stored: the connection is held in the Raspberry Pi's memory only (never on its memory card), so a restart clears it. A store can switch on Keep it for emails and kitchen screen (under Password and LifeLenz in Store settings, or the tick on the Connect page), which keeps an encrypted copy so the daily emails and the kitchen screen keep working when nobody has connected. The token is never shown on any page. LifeLenz's own web page extends a sign-in before it runs out, and ShiftTools can do the same: press Renew now under Password and LifeLenz in Store settings to try it. ShiftTools also renews every connection about every 6 hours by itself (the server setting LIFELENZ_AUTO_RENEW=1 in admin.env), so a connected store stays connected without anyone using Send to ShiftTools again. Renew all on the Stores admin page does it for every store at once. If it stops working (for example after a restart, for a store that doesn't keep its connection), a red banner appears on the floorplan ("LifeLenz isn't accepting this store's connection") and an admin may get an email. To fix it:
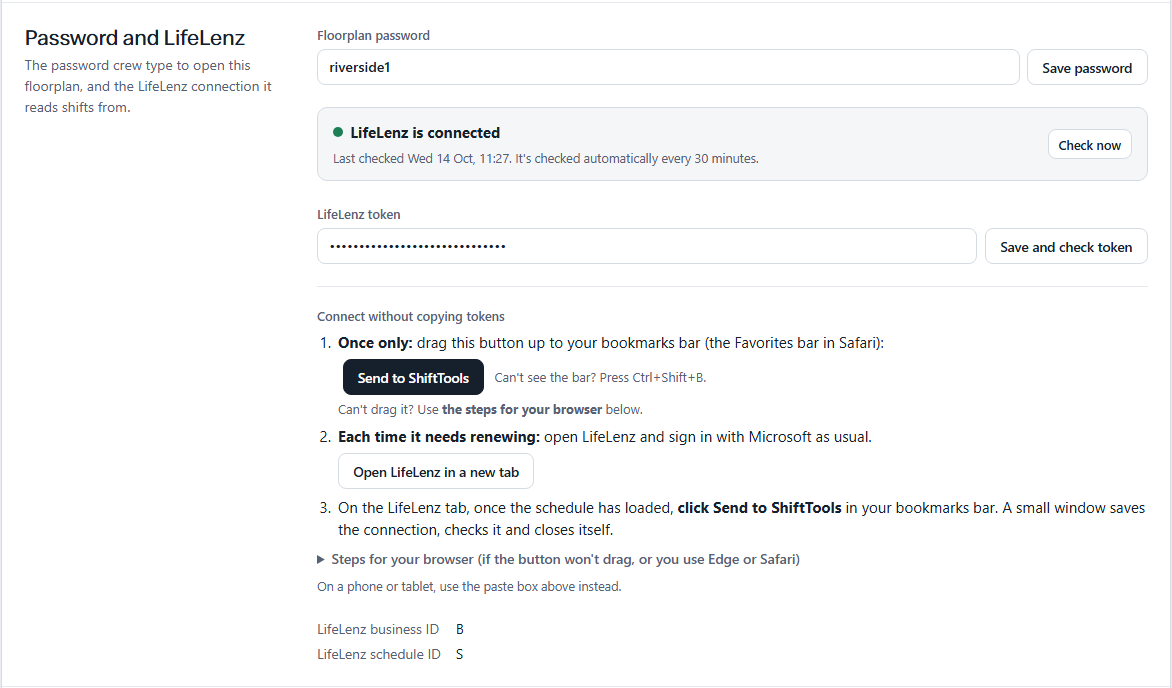
- Press Reconnect under the store on the Stores page, or open Store settings and find Password and LifeLenz.
- Once only: drag the Send to ShiftTools button up to your bookmarks bar (the Favorites bar in Safari). Can't see the bar? Press Ctrl+Shift+B (Cmd+Shift+B on a Mac), or in Safari choose View, then Show Favorites Bar.
- Press Open LifeLenz in a new tab and sign in with Microsoft as usual. Wait for the schedule to load.
- On the LifeLenz tab, click Send to ShiftTools in your bookmarks bar. A small window saves the connection, checks it with LifeLenz and closes itself. If you look after more than one store, it asks which stores to save it for first, and you press Save and check.
- Back on the settings page, the green Connected message appears by itself (no need to reload).
Press Check now to test the connection. It also checks itself every 30 minutes. If the button won't drag (Microsoft Edge, or Safari on a Mac), the page shows the alternative steps for Windows and Mac (Chrome, Edge and Safari), with the Mac shortcuts (Cmd in place of Ctrl). If your browser blocks the ShiftTools window as a pop-up, allow pop-ups for LifeLenz and click the button again. The button only works on LifeLenz's own page, which is why ShiftTools can't do it for you from here.
The daily tasks email Managers
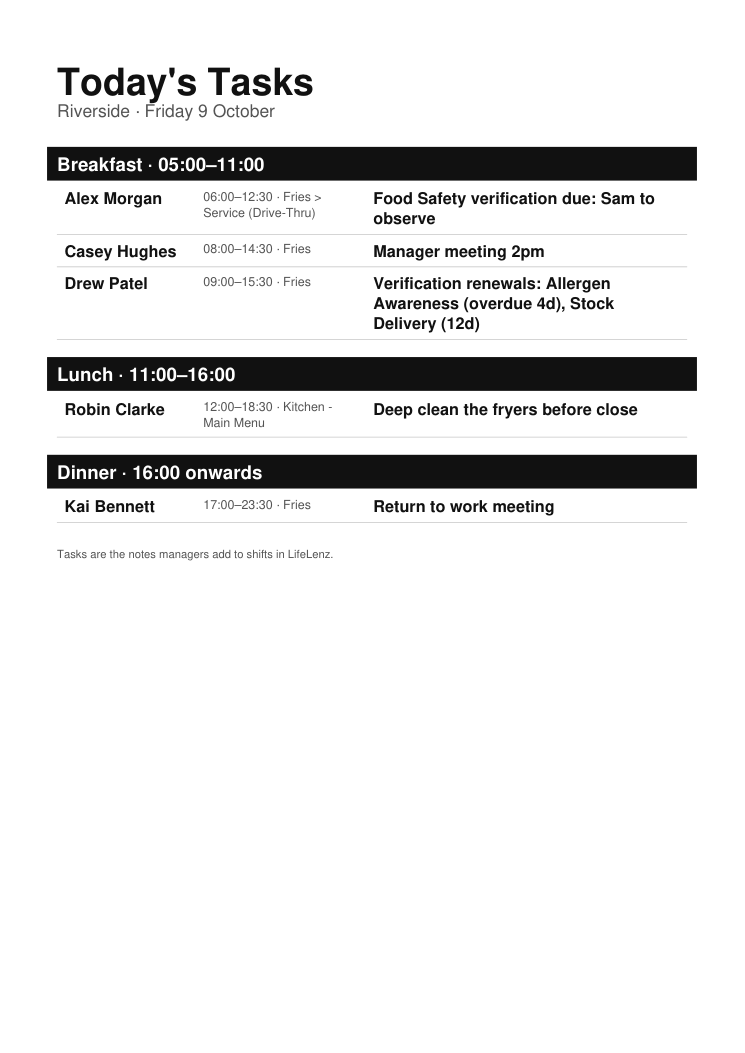
Each morning ShiftTools can email the store the day's shift notes as a list of tasks: who it's for, what their shift is, and the note. It is sent from 06:00 and only on days when there are notes.
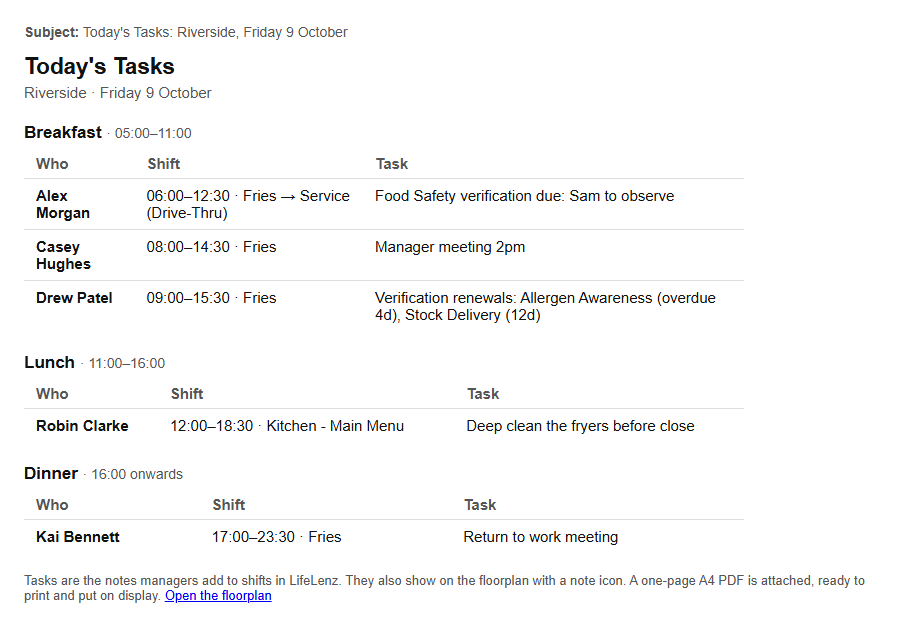
- Tasks are grouped by daypart, using when the shift starts: Overnight (before 05:00), Breakfast (05:00 to 11:00), Lunch (11:00 to 16:00) and Dinner (16:00 on).
- A one-page A4 PDF is attached, ready to print and put up so everyone knows what's expected on their shift.
Setting it up
- Open Store settings and find Daily shift notes email.
- Type one or more email addresses, separated by commas, and tick Send the email every morning. Press Save.
- Press Send today's tasks now to check it arrives.
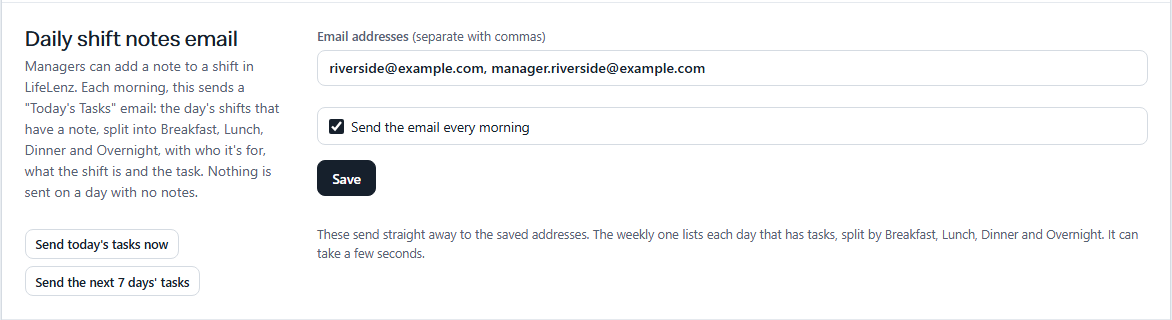
Send the next 7 days' tasks sends one email for the whole week, each day with its tasks grouped by daypart, and a one-page PDF too. Each store has its own addresses and its own on/off switch.
Tasks come from the notes on shifts, including those added by Plan notes for next shifts in Training, so verifications get planned in.
Help and fixes Everyone
I can't see anyone in the To place list
Check the date and shift at the top. If they are right, nobody is rostered then, or LifeLenz isn't connected (a red banner shows if so). You can still add someone with Add shift.
A red banner says LifeLenz isn't accepting the connection
Shifts and clock-ins can't load until it is reconnected. A manager does it in Store settings (see Connecting LifeLenz).
Everyone shows as "Not in"
Clock-in status comes from LifeLenz and refreshes every few minutes. If clock-ins can't be read, a message says so and everyone shows as not clocked in.
I changed a shift but someone else can't see it
Placing people on stations is shared, but added or edited shifts stay on the device you used. Make the change in LifeLenz, or do it on every screen that needs it.
The password page keeps saying it's wrong
Check with your manager that you have the current password. After too many wrong tries you have to wait 15 minutes.
Auto-assign is greyed out
It has already been run for this shift. Reset the floorplan to run it again.
My manager account isn't working
New accounts have to be approved by an admin first. Sign in with your email address; capital letters don't matter. Ask an admin to check your account if it still won't let you in.
The print is cut off or runs to two pages
Choose A4, Landscape, and leave scale at 100% or Default. If it still doesn't fit, tell us which browser you're using.
Something else
Use Send a suggestion on the Stores page, or ask your manager.
Words used here
- LifeLenz
- The rostering system. ShiftTools reads shifts, clock-ins, breaks, notes and sales figures from it.
- Floorplan
- The plan for a shift showing who is on which station.
- Group, station, position (slot)
- A group is a box on the floorplan (such as "Made For You"). It holds stations (such as "Line 1"), and each station has positions for people.
- Shift (daypart)
- Breakfast, Lunch, Dinner or Overnight.
- To place
- People on this shift who aren't on the floorplan yet.
- Store password
- The password for the floorplan and Training pages. Managers set it.
- Manager login
- An email address and password for changing layouts and settings.
- Note (shift description)
- A short message on a shift in LifeLenz.
- Verification
- A check that a crew member can do a task or station to standard, recorded in MyTraining. Many need renewing.
- SRIW, WVP
- Respectful-workplace and workplace-violence eLearning courses, which expire and need renewing.
- Crew Trainer
- A crew member who carries out verifications for others.
- Coverage
- The share of the crew trained on a verification.
- Turnover (12 months, year to date, 90-day)
- The share of the crew who have left over that period, as the Hiring & Turnover report works it out.
- HIG chat
- A catch-up chat with a new hire at 2, 4, 6, 8, 12 and 24 weeks after they start (weeks 6 and 8 aren't needed for adults).
- On-boarding
- The things a new starter has to complete (ETW, online orientation, bank details, NI number, CDP and a probation review, which is due within three months of starting), as listed in the report.